一个系统的输入有哪些?
如果是电脑上,有鼠标、键盘、手柄;主机上主要是手柄;移动设备上则是屏幕、加速度计、陀螺仪。
除此之外,还有一些比较特殊的反馈,例如PC手柄的基础振动,PS平台的手柄还支持力反馈和吹气,移动端也可以触发手机的振动等。
1. Input Manager
在开始介绍 Input System 之前,稍微回顾下之前的输入系统 Input Manager。
首先,输入系统肯定需要支持读取较为原始的输入,比如一个具体的键盘按键是否被按下,鼠标在屏幕上的位置,两帧之间的鼠标移动的差值等等。
同时,作为一个系统,它应该也需要提供一点抽象。Input Manager 提供了两种抽象,一种是按键(Button),一种是轴向(Axis),在本文后面会提到。
1.1 检测键盘鼠标的输入
一个系统最基本的功能就是要能比较原始的去检测键盘鼠标的输入,Input Manager 采用的是轮询机制,也就是说,程序员在每次 Update 中去主动去轮询是否有按键按下。
下面是一个在 Update 中轮询检测键盘和鼠标:
void Update()
{
    // 按下一次触发(帧级检测)
    if (Input.GetKeyDown(KeyCode.Space))
    {
        Debug.Log("按下了空格键");
    }

    // 按住时持续触发
    if (Input.GetKey(KeyCode.W))
    {
        Debug.Log("正在按住 W 键");
    }

    // 松开时触发
    if (Input.GetKeyUp(KeyCode.Escape))
    {
        Debug.Log("松开了 Esc 键");
    }

    // 检测鼠标位置
    Vector3 mousePos = Input.mousePosition;

    // 左键按下
    if (Input.GetMouseButtonDown(0))
    {
        Debug.Log("Left Click at " + mousePos);
    }
}
有了鼠标和键盘的基本输入就完全够了,现在只要不断配合其他API,加上一些代码上的组织,就可以实现任何 PC 游戏上的任何功能。
例如在游戏中,想检测鼠标点击的物体,可以用射线投射:
if (Input.GetMouseButtonDown(0))
{
    Ray ray = Camera.main.ScreenPointToRay(Input.mousePosition);
    if (Physics.Raycast(ray, out RaycastHit hit))
    {
        Debug.Log("Clicked on " + hit.collider.name);
    }
}
1.2 按键和轴
在 Edit → Project Settings → Input Manager 中,Unity 默认已经配置了一些输入(比如 Fire1、Jump)。
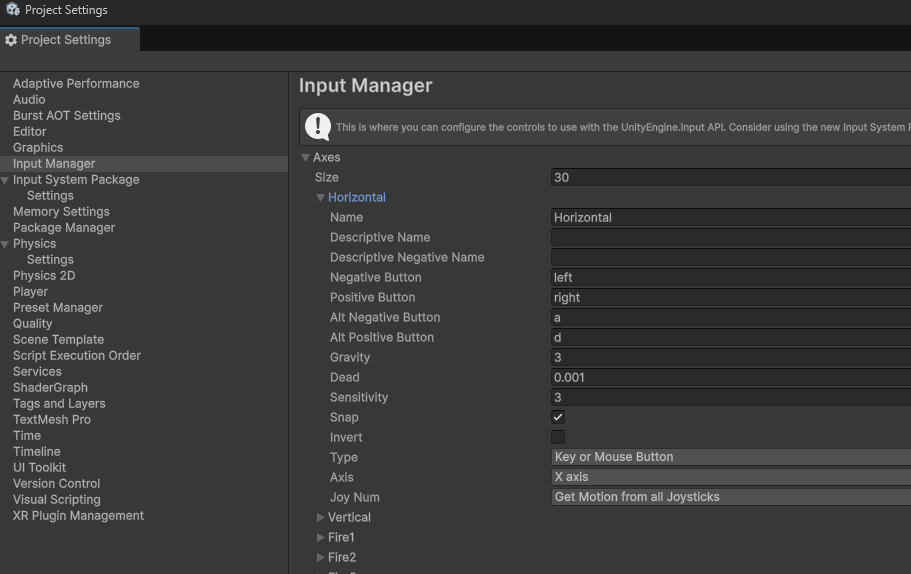
对于每个输入,可以采用按键方式或者轴的方式去读取,这里相当于做了一层简单的抽象。并且多个来源的输入,是可以绑定为同一个 Name 的,这样就支持了多设备输入。
实现按键的读取,只需要用 GetButtonDown 的 API 去读取设置中定义的 Name:
// Fire1 默认绑定是 Ctrl / 鼠标左键 / 手柄 A 键
if (Input.GetButtonDown("Fire1"))
{
    Debug.Log("执行攻击!");
}

// Jump 默认绑定是空格键
if (Input.GetButtonDown("Jump"))
{
    Debug.Log("跳跃");
}
同样,也可以使用 GetAxis 去读取 Name 实现一个WASD的操作,能作为一个轴来读取的需要设置正值表示的按键和负值表示的按键,或者绑定到一个摇杆轴上:
// 键盘 A/D 或 左/右箭头,默认映射为 Horizontal
float horizontal = Input.GetAxis("Horizontal");

// 键盘 W/S 或 上/下箭头,默认映射为 Vertical
float vertical = Input.GetAxis("Vertical");

Vector3 move = new Vector3(horizontal, 0, vertical);
Debug.Log("当前输入方向:" + move);
1.3 手机传感器
移动端和 PC 端的差异还是非常大的,通常手机上是没有键盘设备的,只有手指能代替鼠标进行一些点击,所以移动端设备会使用虚拟摇杆和一些虚拟按钮,比如王者荣耀、PUBG。
除了操作虚拟摇杆和虚拟按钮,还有一些传感器是 PC 上没有的,比如陀螺仪。
加速度
Vector3 accel = Input.acceleration;
Debug.Log("加速度: " + accel);
陀螺仪
Input.gyro.enabled = true;
// 设备方向
Quaternion attitude = Input.gyro.attitude;

// 重力方向
Vector3 gravity = Input.gyro.gravity;

// 角速度
Vector3 rotationRate = Input.gyro.rotationRate;
指南针
Input.compass.enabled = true;
float heading = Input.compass.trueHeading;
Debug.Log("朝向角度: " + heading);
设备方向
if (Input.deviceOrientation == DeviceOrientation.LandscapeLeft)
{
    Debug.Log("横屏(左)");
}
触控屏这个使用起来的时候会稍微复杂一点,建议阅读下官方文档:Unity-TouchPhase
Input API 可以查看有多少个手指触摸屏幕,以及每个手指是点击还是移动等。你可以想象是有很多个鼠标放在手机屏幕上,当然差别在于还可以通过半径来检测触摸半径(部分设备支持)。
if (Input.touchCount > 0)
{
    Touch touch = Input.GetTouch(0);

    Debug.Log($"触摸位置: {touch.position}, 半径: {touch.radius}, 压力: {touch.pressure}");

    if (touch.phase == TouchPhase.Moved)
    {
        // 把屏幕移动量转成世界坐标偏移
        Vector3 delta = new Vector3(touch.deltaPosition.x, touch.deltaPosition.y, 0);
        transform.Translate(delta * 0.01f);
    }
}
1.4 局限性
虽然理论上大部分功能都可以通过 Input Manager 实现,但是有一些局限性依然存在。现在 Unity 官方已经推荐完全使用 Input System 系统,也推荐在项目打包的时候,仅仅保留 Input System。
有几个比较明显的局限性:
- 绑定是固定的,运行时无法修改:所有输入映射都在 Project Settings → Input Manager 里配置。 游戏运行中不能动态改键,玩家无法自由设置按键。如果要做改键功能,只能自己写一层封装。
- 不支持新的硬件:VR/AR、Switch JoyCon、PS5 自适应扳机等。
- 不支持热插拔。插入或拔出新设备(如手柄),游戏中不会自动识别。
Input System 完全是 Input Manager 的上位替代,建议开发的时候统一就用 Input System,这里写出 Input Manager 只是为了方便阅读一些老代码。
2. Input System
2.1 切换输入系统
如果你使用的是 Unity 6 以上的版本,它默认就是同时开启 Input System 和 Input Manager 两种模式。

在项目设置的 Player 中,可以找到当前激活的输入系统,这里建议仅保留 Input System 即可。
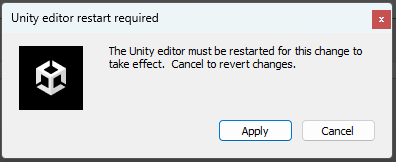
选择后需要重启编辑器才能生效。
2.2 基本的输入
直接查询设备的状态,类似旧的 Input.GetKey。
using UnityEngine;
using UnityEngine.InputSystem;

public class DirectInputExample : MonoBehaviour
{
    void Update()
    {
        if (Keyboard.current.spaceKey.wasPressedThisFrame)
            Debug.Log("Space pressed!");

        if (Mouse.current.leftButton.isPressed)
            Debug.Log("Mouse Left Down");

        if (Gamepad.current != null && Gamepad.current.aButton.wasReleasedThisFrame)
            Debug.Log("Gamepad A released");
    }
}
还有更底层的直接读取 event 信息的方法,直接注册到输入事件流,但是通常不会用到:
using UnityEngine;
using UnityEngine.InputSystem;
using UnityEngine.InputSystem.LowLevel;

public class RawEventExample : MonoBehaviour
{
    void OnEnable()
    {
        InputSystem.onEvent += OnInputEvent;
    }

    void OnDisable()
    {
        InputSystem.onEvent -= OnInputEvent;
    }

    void OnInputEvent(InputEventPtr eventPtr, InputDevice device)
    {
        Debug.Log($"Raw Event: {eventPtr.type}, Device: {device}");
    }
}
2.3 Input Action Asset
在资产窗口中右键点击 Create -> Input Action 可以创建一个 Input Action Asset。
我们以 Unity 6 URP 项目默认的 Input Action Asset 为例来讲解一下配置:
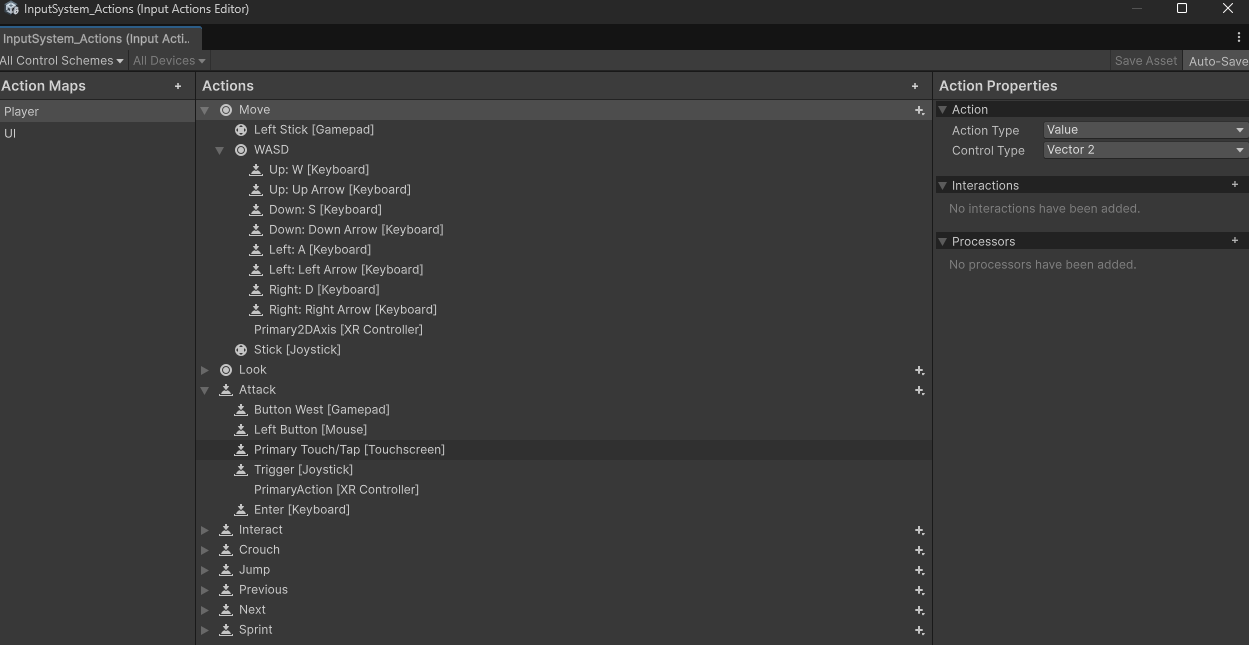
- Action Maps:表示一组动作,类似控制模式,比如在游戏中可以是
Player,在 UI 界面则切换为UI。同一时间只激活一组 Action Maps。 - Actions:具体的操作,右侧可以选择
Action Type,有数值Value,按钮Button,还有Pass Through直通模式。一个 Actions 可以对应多种输入,比如 Move 就同时对应:- 手柄左摇杆
- (WASD/上下左右方向键)
- 摇杆类设备
2.4 使用 Player Input 组件
Player Input 组件是最简单的使用 Action 的方法,它支持选择 Map 和通知方式。
通知方式有四种选择:
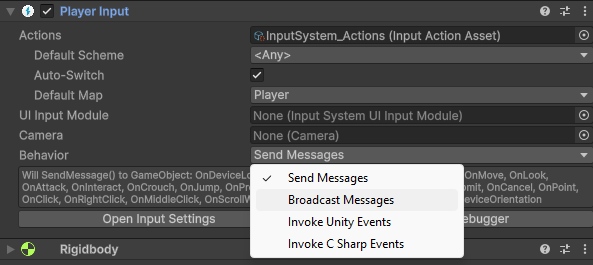
Send Messages 和 Broadcast Messages
Send Messages 和 Broadcast Messages 都是 Unity 中反射的方法,可以在对象之间进行通信。
两种使用方式是一样的,只是 Send Messages 只会通知当前 gameObject ,而 Broadcast Messages 还会通知子对象。
按照组件中提示的这些创建一个个方法,就可以接收消息了。由于只会在值改变的时候发送通知消息,所以 OnMove 的值需要保存下来。而 OnJump 只需要改变垂直速度一次就可以直接处理逻辑。
using UnityEngine;
using UnityEngine.InputSystem;

public class PlayerMovement : MonoBehaviour
{
    [SerializeField] private float speed = 20;
    [SerializeField] private float jumpForce = 5;

    private Vector2 direction;

    void OnJump(InputValue value)
    {
        if (value.isPressed)
        {
            GetComponent<Rigidbody>().linearVelocity = new Vector3(0, jumpForce, 0);
        }
    }

    void OnMove(InputValue value)
    {
        direction = value.Get<Vector2>();
    }

    private void Update()
    {
        transform.Translate(new Vector3(direction.x, 0, direction.y) * (Time.deltaTime * speed));
    }
}
测试下基本的移动和跳跃:
C Sharp Events
用 C# 的事件机制来调用,这种方法更清晰的区分 started/canceled/performed 这三个时机。
唯一需要注意的是,取消的时候记得取消注册通知,尤其是在不同关卡之间切换的时候,如果绑定了又忘记取消可能就会有 BUG 。
using System;
using UnityEngine;
using UnityEngine.InputSystem;

public class PlayerMovementCSharpEvents : MonoBehaviour
{
    [SerializeField] private float speed = 20;
    [SerializeField] private float jumpForce = 5;

    private Vector2 direction;

    private InputAction moveAction;
    private InputAction jumpAction;

    private void Start()
    {
        PlayerInput playerInput = GetComponent<PlayerInput>();
        moveAction = playerInput.actions["Move"];
        jumpAction = playerInput.actions["Jump"];

        moveAction.performed += OnMovePerformed;
        moveAction.canceled += OnMoveCanceled;
        jumpAction.started += OnJumpStarted;
    }

    void OnDestroy()
    {
        moveAction.performed -= OnMovePerformed;
        moveAction.canceled -= OnMoveCanceled;
        jumpAction.started -= OnJumpStarted;
    }

    private void OnJumpStarted(InputAction.CallbackContext obj)
    {
        GetComponent<Rigidbody>().linearVelocity = new Vector3(0, jumpForce, 0);
    }

    private void OnMoveCanceled(InputAction.CallbackContext obj)
    {
        direction = Vector2.zero;
    }

    private void OnMovePerformed(InputAction.CallbackContext obj)
    {
        direction = obj.ReadValue<Vector2>();
    }

    private void Update()
    {
        transform.Translate(new Vector3(direction.x, 0, direction.y) * (Time.deltaTime * speed));
    }
}
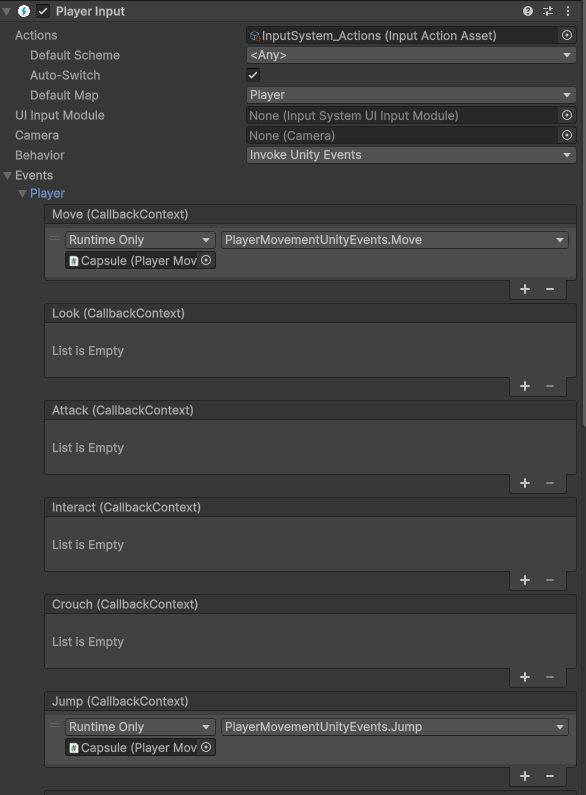
Unity Events
Unity Events 属于可视化拖动式绑定,只需要把一个个被调用的函数给写好:
using UnityEngine;
using UnityEngine.InputSystem;

public class PlayerMovementUnityEvents : MonoBehaviour
{
    [SerializeField] private float speed = 20;
    [SerializeField] private float jumpForce = 5;

    private Vector2 direction;

    public void Jump(InputAction.CallbackContext action)
    {
        if (action.started)
        {
            GetComponent<Rigidbody>().linearVelocity = new Vector3(0, jumpForce, 0);
        }
    }

    public void Move(InputAction.CallbackContext action)
    {
        direction = action.ReadValue<Vector2>();
    }

    private void Update()
    {
        transform.Translate(new Vector3(direction.x, 0, direction.y) * (Time.deltaTime * speed));
    }
}
然后在组件检视窗口中绑定相关的方法即可:
2.5 Generate C# Class
最合适的用法还是完全通过代码来控制输入,前面使用组件的时候,解耦性过于强,只有运行过程中才能确定是否绑定成功。而通过生成代码的方式可以避免这个问题。
首先找到 Input Action Asset,然后勾选生成代码 Generate C# Class,这里的类名可以指定一个新的。
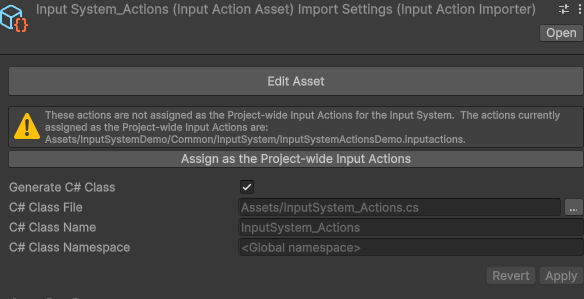
生成之后,最大的优势在于,之前需要通过字符串来表示的 Jump 现在都在编译期确定了,例如下面的:
using UnityEngine;

public class PlayerController : MonoBehaviour
{
    private InputSystem_Actions inputActions;

    private void Awake()
    {
        inputActions = new InputSystem_Actions();
    }

    private void OnEnable()
    {
        inputActions.Enable();
    }

    private void OnDisable()
    {
        inputActions.Disable();
    }

    private void Update()
    {
        Vector2 move = inputActions.Player.Move.ReadValue<Vector2>();

        if (inputActions.Player.Jump.triggered)
        {
            Debug.Log("Jump pressed!");
        }
    }
}
2.6 Generate C# Class 和 事件
通常不推荐在 Update 中去轮询的做法,更好的做法是采用事件的机制,当某个按钮对应的事件发生的时候,去调用一个指定的函数。
然后 new InputSystem_Actions() 多次也是不会有冲突的,它们都能够正常在不同组件中独立使用。不过通常我们还是会使用一个组件来获取所有的输入,然后通过事件机制传递给其他部分,而不是每个部分都单独创建一个新的 InputSystem_Actions。
using UnityEngine;
using UnityEngine.InputSystem;

public class PlayerController : MonoBehaviour
{
    private InputSystem_Actions inputActions;

    [SerializeField] private float speed = 20;
    [SerializeField] private float jumpForce = 5;
    private Vector2 direction;

    private void Awake()
    {
        inputActions = new InputSystem_Actions();
    }

    private void OnEnable()
    {
        inputActions.Player.Jump.started += OnJumpStarted;
        inputActions.Player.Move.performed += OnMovePerformed;
        inputActions.Player.Move.canceled += OnMoveCanceled;

        inputActions.Enable();
    }

    private void OnDisable()
    {
        inputActions.Player.Jump.started -= OnJumpStarted;
        inputActions.Player.Move.performed -= OnMovePerformed;
        inputActions.Player.Move.canceled -= OnMoveCanceled;

        inputActions.Disable();
    }

    private void OnJumpStarted(InputAction.CallbackContext ctx)
    {
        GetComponent<Rigidbody>().linearVelocity = new Vector3(0, jumpForce, 0);
    }

    private void OnMovePerformed(InputAction.CallbackContext ctx)
    {
        direction = ctx.ReadValue<Vector2>();
    }

    private void OnMoveCanceled(InputAction.CallbackContext ctx)
    {
        direction = Vector2.zero;
    }

    private void Update()
    {
        transform.Translate(new Vector3(direction.x, 0, direction.y) * (Time.deltaTime * speed));
    }
}
3. 补充
3.1 手柄振动
我手上有一个 XBOX 的手柄,它支持设置低频振动和高频振动。低频振动会有更大的抖动感,高频更像是手机振动的那种提醒感。
振动通过 Gamepad 来设置,例如下面的代码中,按下 A 键触发振动,按下 X 键停止振动。这里停止就是指设置振动值为 0 。
using UnityEngine;
using UnityEngine.InputSystem;

public class GamepadHaptics : MonoBehaviour
{
    private Gamepad gamepad;

    private void Update()
    {
        gamepad = Gamepad.current;
        if (gamepad == null) return;

        if (gamepad.buttonSouth.wasPressedThisFrame)
        {
            // 设置低频和高频振动(0~1)
            gamepad.SetMotorSpeeds(0.5f, 0.5f);
        }

        if (gamepad.buttonWest.wasPressedThisFrame)
        {
            gamepad?.SetMotorSpeeds(0f, 0f);
        }
    }
}
3.2 陀螺仪等
和旧版的输入系统一样,Input System 也能读取移动设备(手机、平板)的陀螺仪和加速度计。
using UnityEngine;
using UnityEngine.InputSystem;

public class MobileSensors : MonoBehaviour
{
    private void Update()
    {
        // 加速度
        Vector3 accel = Accelerometer.current?.acceleration.ReadValue() ?? Vector3.zero;
        Debug.Log($"Acceleration: {accel}");

        // 陀螺仪
        if (Gyroscope.current != null)
        {
            Vector3 gyro = Gyroscope.current.angularVelocity.ReadValue();
            Debug.Log($"Gyro: {gyro}");
        }
    }
}
3.3 虚拟摇杆
商店中有一些可用的资源:Joystick Pack
这里讲解一个简单的不依赖外部实现的方式:
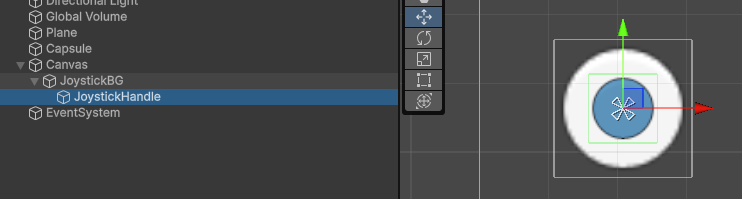
首先创建一个 UI 界面,然后创建:
- Image 虚拟摇杆背景
JoystickBG - Image 虚拟摇杆
JoystickHandle,放在背景JoystickBG的正中间
然后给虚拟摇杆 JoystickHandle 上一个组件 Event Trigger,它在按下、拖拽、抬起的时候,都会发送事件。
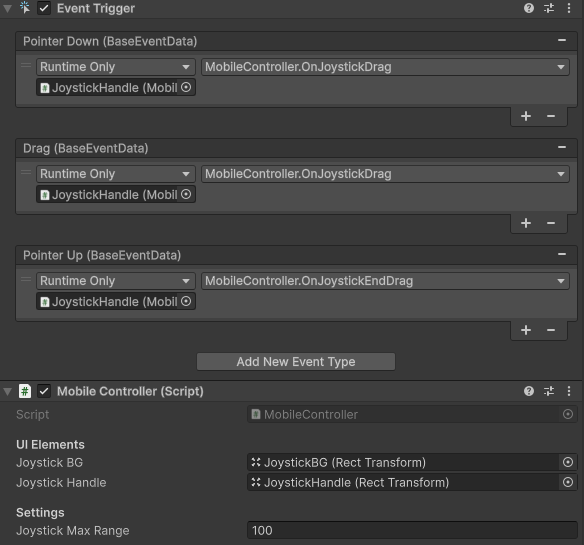
之后 MobileController 的代码如下:
- 通过绑定事件来触发摇杆的效果
using System;
using UnityEngine;
using UnityEngine.EventSystems;

public class MobileController : MonoBehaviour
{
    [Header("UI Elements")]
    public RectTransform joystickBG;
    public RectTransform joystickHandle;

    [Header("Settings")]
    public float joystickMaxRange = 100f; // 摇杆最大位移

    private Vector2 joystickInput = Vector2.zero;

    public event Action<Vector2> OnPerformed;

    private void Update()
    {
        // 通知
        Debug.Log($"Joystick Input: {joystickInput}");
        OnPerformed?.Invoke(joystickInput);
    }

    public void OnJoystickDrag(BaseEventData data)
    {
        PointerEventData pointerData = data as PointerEventData;
        Vector2 pos;
        RectTransformUtility.ScreenPointToLocalPointInRectangle(
            joystickBG,
            pointerData.position,
            pointerData.pressEventCamera,
            out pos
        );

        // 限制最大范围
        joystickInput = Vector2.ClampMagnitude(pos / joystickMaxRange, 1f);

        // 更新手柄位置(UI效果)
        joystickHandle.anchoredPosition = joystickInput * joystickMaxRange;
    }

    public void OnJoystickEndDrag(BaseEventData data)
    {
        joystickInput = Vector2.zero;
        joystickHandle.anchoredPosition = Vector2.zero;

        Debug.Log("Joystick Released");
    }
}
使用的时候只要注册到这个 OnPerformed 事件就可以了:
using UnityEngine;

public class PlayerController : MonoBehaviour
{
    [SerializeField] MobileController mobileController;

    [SerializeField] private float speed = 20;
    [SerializeField] private float jumpForce = 5;

    private Vector2 direction;

    private void OnEnable()
    {
        mobileController.OnPerformed += MobileControllerOnOnPerformed;
    }

    private void MobileControllerOnOnPerformed(Vector2 mobileInput)
    {
        direction = mobileInput;
    }

    private void Update()
    {
        transform.Translate(new Vector3(direction.x, 0, direction.y) * (Time.deltaTime * speed));
    }
}
看一下演示效果:
