首先明确一点,编辑器开发的知识还是很多的,正确的学习方式还是从实践入手,用查工具一样的方式去学习使用。
1. Unity编辑器开发前置知识
1.1 什么是注解(Attribute)?
注解(Attribute) 是 C# 提供的一种元数据(Metadata)机制,用于在类、方法、字段、属性等上附加额外的信息。
在 Unity 编辑器开发中,注解常用于告诉 Unity 或自定义的编辑器脚本如何处理某个对象或方法。
[Serializable]
public class PlayerData
{
    public int health;
    public int score;
}

[SerializeField] private int health = 100;

[Range(0, 10)] public float speed = 5f;

[MenuItem("Tools/Run Custom Action")]
public static void Run() { ... }
这里的 [Serializable] 告诉 Unity 这个类可以被序列化,从而能在 Inspector 中显示。
1.2 如何给类与类的方法加注解
你可以在类、方法、字段或属性前加上方括号 [] 来声明注解。
// 给类加注解
[MyCustom("Player Class")]
public class Player
{
    // 给字段加注解
    [Range(0, 100)]
    public int health;

    // 给方法加注解
    [MyCustom("Init Method")]
    public void Initialize()
    {
        Debug.Log("Player initialized");
    }
}

// 自定义一个注解类
[System.AttributeUsage(System.AttributeTargets.Class | System.AttributeTargets.Method)]
public class MyCustomAttribute : System.Attribute
{
    public string Description { get; }

    public MyCustomAttribute(string description)
    {
        Description = description;
    }
}
上例中:
- MyCustomAttribute 是一个自定义注解;
[MyCustom("xxx")]表示在类或方法上附加额外说明信息。- 注意这里的命名时可以省略
Attribute,使用时也可以省略Attribute,前提是无歧义。
1.3 如何读取注解
读取注解通常通过 反射(Reflection) 实现。
using System;
using System.Reflection;
using UnityEngine;

public class AttributeReader
{
    [MyCustom("Example Method")]
    public void Example() { }

    [ContextMenu("Test Read Attributes")]
    void TestRead()
    {
        // 获取类型
        Type type = typeof(AttributeReader);

        // 遍历方法
        foreach (MethodInfo method in type.GetMethods(BindingFlags.Public | BindingFlags.NonPublic | BindingFlags.Instance))
        {
            // 获取自定义注解
            MyCustomAttribute attr = method.GetCustomAttribute<MyCustomAttribute>();
            if (attr != null)
            {
                Debug.Log($"方法 {method.Name} 的描述为: {attr.Description}");
            }
        }
    }
}
运行后会在 Unity 控制台输出注解内容。
这在编辑器工具中非常常见,比如扫描项目中所有打了某个标签的类并自动注册。
2. 自定义 Inspector
2.1 利用 Attribute 直接控制
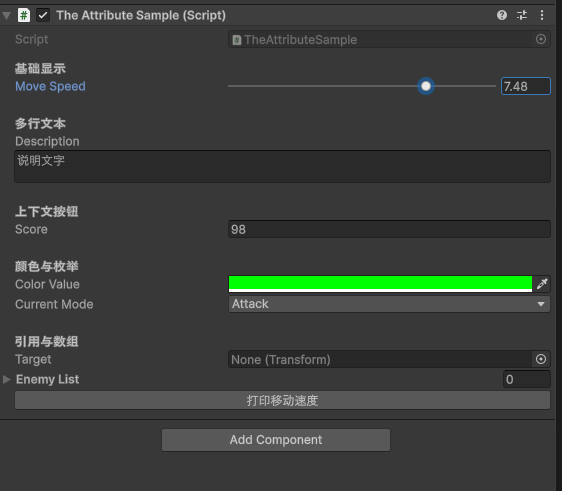
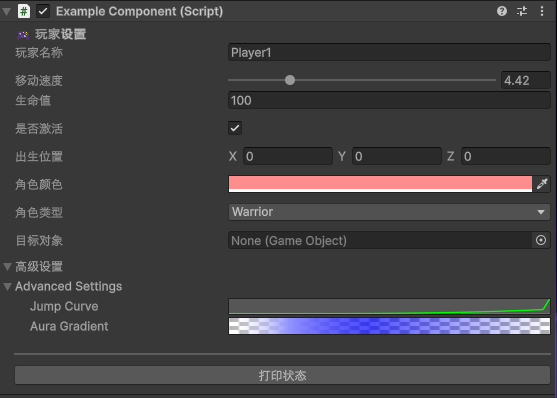
利用 Attribute 可以直接来设置 Inspector 而不用单独编写整个界面,比如下面的代码:
using UnityEngine;
public class TheAttributeSample : MonoBehaviour
{
[Header("基础显示")]
[SerializeField, Tooltip("移动速度 (0~10)")]
[Range(0, 10)]
private float moveSpeed = 5f;
[Space]
[Header("多行文本")]
[TextArea(2, 5)]
public string description = "说明文字";
[ContextMenu("重置参数")]
private void ResetValues()
{
moveSpeed = 5f;
description = "说明文字";
Debug.Log("已重置参数");
}
[Space]
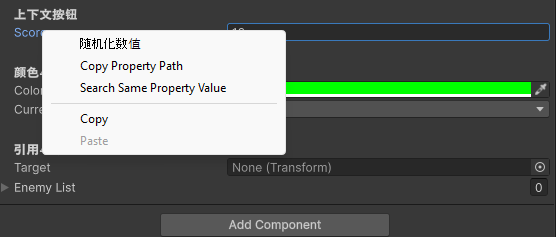
[Header("上下文按钮")]
[ContextMenuItem("随机化数值", "RandomizeValue")]
public int score = 10;
private void RandomizeValue() => score = Random.Range(0, 100);
[Space]
[Header("颜色与枚举")]
public Color colorValue = Color.green;
public Mode currentMode = Mode.Attack;
public enum Mode { Idle, Attack, Defend }
[Space]
[Header("引用与数组")]
public Transform target;
public GameObject[] enemyList;
}
在修改后:
Header添加一个标题Space是空行[Range(0, 100)]和[TextArea()]是具体的界面样式调整。[Tooltip("xxx")]是鼠标移动上去的提示。
ContextMenu 重置参数按钮控制的是组件那个地方。
ContextMenuItem 是在属性的右键菜单中。
2.2 CustomEditor / 自定义界面的方法
前面的 Attribute 与逻辑代码还是贴在一起的,很方便但是自定义程度还不够。
我们可以专门为一个 Component 来编写它的 Inspector,下面就来介绍这种方法。
首先要确保我们的代码的 .cs 文件需要放在任意的名为 Editor 的文件夹下面,然后使用 CustomEditor 来实现自定义绘制。
using System;
using UnityEngine;
using UnityEditor;

[CustomEditor(typeof(TheAttributeSample))] // 关联脚本类型
public class TheAttributeSampleEditor : Editor
{
    SerializedProperty moveSpeed;

    private void OnEnable()
    {
        moveSpeed = serializedObject.FindProperty("moveSpeed");
    }

    public override void OnInspectorGUI()
    {
        // 1. 更新序列化对象
        serializedObject.Update();

        // 2. 绘制默认属性
        DrawDefaultInspector();

        // 3. 自定义按钮
        if (GUILayout.Button("打印移动速度"))
        {
            Debug.Log("MoveSpeed = " + moveSpeed.floatValue);
        }

        // 4. 应用修改
        serializedObject.ApplyModifiedProperties();
    }
}
[CustomEditor(typeof(TheAttributeSample))]表示关联的类是TheAttributeSampleOnInspectorGUI会在显示和输入更改时调用。OnInspectorGUI是override意味着可以通过base.OnInspectorGUI()来表示默认界面。
这里还有个稍微复杂点的用法,就是可以有参数:
public CustomEditor(System.Type inspectedType, bool editorForChildClasses)

public bool isFallback { get; set; }

// 使用下面这行可替换全局 MonoBehaviour 的 Inspector
[CustomEditor(typeof(MonoBehaviour), true, isFallback = true)]
这样可以直接替换掉全局的 MonoBehaviour,但是 isFallback = true 保证了只有没任何其他可用项的时候才会使用当前的这个。
2.3 生命周期
在运行时(Play Mode)我们有:
Awake → OnEnable → Start → Update → OnDisable → OnDestroy
在编辑器扩展(Editor Mode)中也有类似的体系,只不过发生在编辑器层面:
OnEnable → OnInspectorGUI / OnSceneGUI (重复执行) → OnDisable
这些回调运行在 UnityEditor 命名空间下;Unity 会在编辑器状态变动(比如脚本重编译、选中物体、打开 Inspector 等)时自动触发。
Editor 生命周期完整流程(按时间顺序):
| 阶段 | 回调方法 | 调用时机 | 常见用途 |
|---|---|---|---|
| 初始化阶段 | OnEnable() | 当 Inspector 打开 / 选中物体 / 脚本重编译时 | 缓存 SerializedProperty、注册事件、初始化资源 |
| 激活阶段 | OnInspectorGUI() | 每次 Inspector 重绘时调用(非常频繁) | 绘制 UI、检测用户输入、修改数据 |
| 场景绘制阶段 | OnSceneGUI() | 当对象在 Scene 视图中被选中或 Scene 视图重绘时 | 绘制 Gizmo、Handles、交互操作 |
| 预览阶段 | HasPreviewGUI() / OnPreviewGUI() | 在 Inspector 底部绘制预览(模型、音频等) | 自定义资源预览窗口 |
| 更新阶段 | OnInspectorUpdate() | 编辑器定期刷新(大约 10 FPS) | 定时刷新状态、检测异步任务 |
| 销毁阶段 | OnDisable() | 当 Inspector 被关闭、切换选中对象或 Domain Reload 时 | 注销事件、释放内存、清理引用 |
2.4 Editor.serializedObject
在 Editor 脚本中,serializedObject 是一个特殊的对象,它是对你正在编辑的脚本(即 target)的一个 序列化包装(封装层)。
如果你在 Editor 里直接写:
((MyScript)target).speed = 5;
它不支持:
- Undo
- Prefab 标记覆盖
- 多选对象 target 时无法统一修改
Unity 的序列化系统解决了这些问题,所以提供了 serializedObject。
serializedObject= 当前目标对象(target)的序列化版本SerializedProperty= 该对象中的一个字段的序列化包装
比如:
SerializedProperty moveSpeed;

void OnEnable()
{
    moveSpeed = serializedObject.FindProperty("moveSpeed");
}

public override void OnInspectorGUI()
{
    serializedObject.Update();
    EditorGUILayout.PropertyField(speed);
    serializedObject.ApplyModifiedProperties();
}
上面代码可以这么理解:Update 是把 target 的数据同步到 serializedObject,EditorGUILayout.PropertyField 是自动根据类型显示在操作界面,修改的时候会同步回传。而 ApplyModifiedProperties 是把 serializedObject 的修改,传递回 target。
2.5 GUILayout / IMGUI
GUILayout 属于 IMGUI(Immediate Mode GUI)系统,它是最基础的 GUI 绘制类,能在:
MonoBehaviour.OnGUI()(游戏运行时)Editor.OnInspectorGUI()(编辑器自定义 Inspector)EditorWindow.OnGUI()(自定义编辑器窗口)
中使用。
在 Editor 里使用时,一般我们这样写:
public override void OnInspectorGUI()
{
    GUILayout.Label("标题");
}
简记:Label / Text / Toggle / Slider / Button / Layout
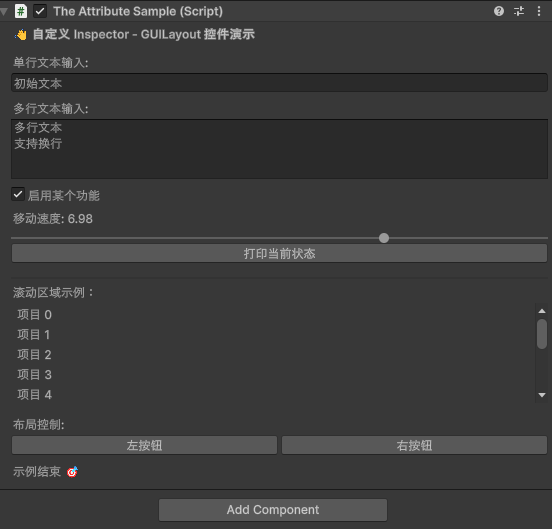
一个综合的例子:
using UnityEngine;
using UnityEditor;

[CustomEditor(typeof(TheAttributeSample))]
public class TheAttributeSampleEditor : Editor
{
    private bool toggleValue = true;
    private float sliderValue = 5f;
    private string inputText = "初始文本";
    private string multiLine = "多行文本\n支持换行";
    private Vector2 scrollPos;

    public override void OnInspectorGUI()
    {
        // 标题
        GUILayout.Label("👋 自定义 Inspector - GUILayout 控件演示", EditorStyles.boldLabel);

        GUILayout.Space(10);

        // 输入框
        GUILayout.Label("单行文本输入:");
        inputText = GUILayout.TextField(inputText);

        GUILayout.Space(5);

        // 多行输入框
        GUILayout.Label("多行文本输入:");
        multiLine = GUILayout.TextArea(multiLine, GUILayout.Height(60));

        GUILayout.Space(5);

        // 开关
        toggleValue = GUILayout.Toggle(toggleValue, "启用某个功能");

        GUILayout.Space(5);

        // 滑条
        GUILayout.Label($"移动速度: {sliderValue:F2}");
        sliderValue = GUILayout.HorizontalSlider(sliderValue, 0, 10);

        GUILayout.Space(10);

        // 按钮
        if (GUILayout.Button("打印当前状态"))
        {
            Debug.Log($"输入: {inputText}, 开关: {toggleValue}, 速度: {sliderValue}");
        }

        GUILayout.Space(10);
        GUILayout.Box("", GUILayout.ExpandWidth(true), GUILayout.Height(2)); // 分隔线

        // 滚动区域
        GUILayout.Label("滚动区域示例:");
        scrollPos = GUILayout.BeginScrollView(scrollPos, GUILayout.Height(100));
        for (int i = 0; i < 20; i++)
        {
            GUILayout.Label("项目 " + i);
        }
        GUILayout.EndScrollView();

        GUILayout.Space(10);

        GUILayout.Label("布局控制:");
        GUILayout.BeginHorizontal();
        if (GUILayout.Button("左按钮")) Debug.Log("左");
        if (GUILayout.Button("右按钮")) Debug.Log("右");
        GUILayout.EndHorizontal();

        GUILayout.Space(5);

        GUILayout.Label("示例结束 🎯");
    }
}
样式:
2.6 EditorGUILayout
EditorGUILayout 是 Unity 编辑器脚本里的一个工具类,它可以帮你在 Inspector 或 自定义窗口里显示各种控件,比如按钮、滑条、颜色选择器等。
自动支持 Undo、Prefab 覆盖、多对象编辑。
和 GUILayout 的区别是,它支持多对象,写起来更简洁,样式统一。
常用控件:
| 控件 | 用途 | 示例 |
|---|---|---|
| LabelField | 显示文本 | EditorGUILayout.LabelField("标题") |
| TextField | 输入单行文字 | EditorGUILayout.TextField("名字", name) |
| TextArea | 多行文字 | EditorGUILayout.TextArea(description) |
| Toggle | 开关 | EditorGUILayout.Toggle("是否启用", isOn) |
| Slider | 滑条 | EditorGUILayout.Slider("速度", speed, 0, 10) |
| IntField | 整数输入 | EditorGUILayout.IntField("生命", hp) |
| FloatField | 浮点输入 | EditorGUILayout.FloatField("速度", speed) |
| Vector3Field | 三维向量 | EditorGUILayout.Vector3Field("位置", pos) |
| ColorField | 颜色选择 | EditorGUILayout.ColorField("颜色", color) |
| ObjectField | 拖拽对象 | EditorGUILayout.ObjectField("目标", obj, typeof(GameObject), true) |
| EnumPopup | 下拉选择枚举 | EditorGUILayout.EnumPopup("类型", playerClass) |
| Foldout | 折叠面板 | fold = EditorGUILayout.Foldout(fold, "高级") |
| PropertyField | 自动绘制 SerializedProperty | EditorGUILayout.PropertyField(serializedProp) |
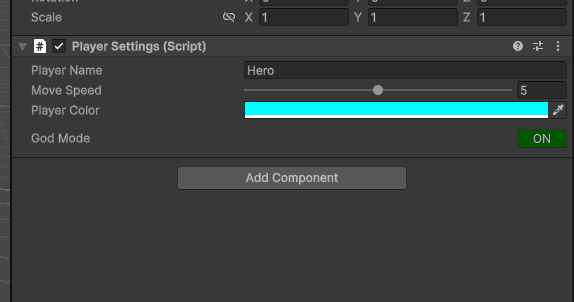
一个案例:
using UnityEngine;

public class PlayerSettings : MonoBehaviour
{
    [SerializeField, Range(0, 10)]
    private float moveSpeed = 5f;

    [SerializeField]
    private string playerName = "Hero";

    [SerializeField]
    private Color playerColor = Color.cyan;

    [SerializeField]
    private bool isGodMode = false;
}
Editor 部分:
using UnityEditor;
using UnityEngine;

[CustomEditor(typeof(PlayerSettings))]
public class PlayerSettingsEditor : Editor
{
    // 定义 SerializedProperty 对象
    SerializedProperty moveSpeed;
    SerializedProperty playerName;
    SerializedProperty playerColor;
    SerializedProperty isGodMode;

    // 初始化:在编辑器加载时绑定字段
    void OnEnable()
    {
        moveSpeed = serializedObject.FindProperty("moveSpeed");
        playerName = serializedObject.FindProperty("playerName");
        playerColor = serializedObject.FindProperty("playerColor");
        isGodMode = serializedObject.FindProperty("isGodMode");
    }

    // 自定义 Inspector 界面
    public override void OnInspectorGUI()
    {
        // 同步目标对象的最新数据
        serializedObject.Update();

        GUILayout.Label("🎮 Player Settings", EditorStyles.boldLabel);
        EditorGUILayout.Space();

        // 绘制属性字段(自动支持撤销 / Prefab)
        EditorGUILayout.PropertyField(playerName, new GUIContent("Player Name"));
        EditorGUILayout.PropertyField(moveSpeed, new GUIContent("Move Speed"));
        EditorGUILayout.PropertyField(playerColor, new GUIContent("Player Color"));
        EditorGUILayout.PropertyField(isGodMode, new GUIContent("God Mode"));

        EditorGUILayout.Space(10);

        // 添加一个自定义按钮
        if (GUILayout.Button("打印玩家信息"))
        {
            var player = (PlayerSettings)target;
            Debug.Log($"👤 {playerName.stringValue} - 速度: {moveSpeed.floatValue}, 无敌: {isGodMode.boolValue}");
        }

        // 提交修改回目标对象
        serializedObject.ApplyModifiedProperties();
    }
}
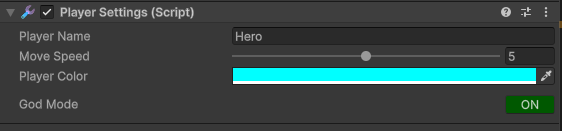
效果:
完全可以理解为是一个抽象了一个中间层的 IMGUI,避免手动绑定一些写法。如果复杂点写,还可以实现下面的效果:
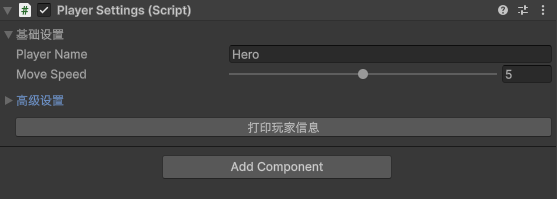
2.6.1 展开折叠的例子
这个例子虽然简单,但是由于太过常用,这里专门写一下。
展开折叠的例子:
using UnityEngine;
using UnityEditor;

[CustomEditor(typeof(PlayerSettings))]
public class PlayerSettingsEditor : Editor
{
    // SerializedProperty 对象
    SerializedProperty moveSpeed;
    SerializedProperty playerName;
    SerializedProperty playerColor;
    SerializedProperty isGodMode;

    // 折叠状态变量
    bool showBasicSettings = true;
    bool showAdvancedSettings = false;

    void OnEnable()
    {
        moveSpeed = serializedObject.FindProperty("moveSpeed");
        playerName = serializedObject.FindProperty("playerName");
        playerColor = serializedObject.FindProperty("playerColor");
        isGodMode = serializedObject.FindProperty("isGodMode");
    }

    public override void OnInspectorGUI()
    {
        serializedObject.Update();

        // 折叠面板:基础设置
        showBasicSettings = EditorGUILayout.Foldout(showBasicSettings, "基础设置");
        if (showBasicSettings)
        {
            EditorGUILayout.PropertyField(playerName);
            EditorGUILayout.PropertyField(moveSpeed);
        }

        EditorGUILayout.Space();

        // 折叠面板:高级设置
        showAdvancedSettings = EditorGUILayout.Foldout(showAdvancedSettings, "高级设置");
        if (showAdvancedSettings)
        {
            EditorGUILayout.PropertyField(playerColor);
            EditorGUILayout.PropertyField(isGodMode);
        }

        EditorGUILayout.Space();

        // 打印按钮
        if (GUILayout.Button("打印玩家信息"))
        {
            Debug.Log($"玩家 {playerName.stringValue}, 速度 {moveSpeed.floatValue}, " +
                      $"颜色 {playerColor.colorValue}, 无敌: {isGodMode.boolValue}");
        }

        serializedObject.ApplyModifiedProperties();
    }
}
效果实现:
2.7 Handles / OnSceneGUI
OnSceneGUI 是 Unity 自定义编辑器里的一个回调函数,允许你在 Scene 视图中绘制和交互,每次 Scene 视图刷新时自动调用。
Handles 是 Unity 提供的一组 Scene 视图可视化控件和绘图工具:
| 方法 | 用途 |
|---|---|
Handles.PositionHandle | 可拖拽控制位置 |
Handles.RotationHandle | 可旋转控制 |
Handles.ScaleHandle | 可缩放控制 |
Handles.Label | 显示文本标签 |
Handles.SphereHandleCap | 绘制球体 |
Handles.DrawLine | 绘制线条 |
Handles.DrawWireCube | 绘制空心方块 |
我们直接上使用方式。首先给 PlayerSettings 增加一个三维坐标,后面会用 Handles 来可视化操作这个三维坐标。
public class PlayerSettings : MonoBehaviour
{
    // ...
    //
    public Vector3 scenePosition = Vector3.zero;
}
然后在 OnSceneGUI 中通过 Handles 来实现操作 scenePosition 的可视化修改。
using UnityEditor;
using UnityEditor.TerrainTools;
using UnityEngine;

[CustomEditor(typeof(PlayerSettings))]
public class PlayerSettingsEditor : Editor
{
    private void OnSceneGUI()
    {
        PlayerSettings player = (PlayerSettings)target;

        // 开始监测修改
        EditorGUI.BeginChangeCheck();

        // 拖拽 PositionHandle 控制 scenePosition
        Vector3 newPos = Handles.PositionHandle(player.scenePosition, Quaternion.identity);

        if (EditorGUI.EndChangeCheck())
        {
            Undo.RecordObject(player, "Move Scene Position");  // 支持 Undo
            player.scenePosition = newPos;                     // 更新位置
            EditorUtility.SetDirty(player);                   // 标记对象已修改
        }

        // 绘制一个球体标记
        Handles.color = Color.aliceBlue;
        Handles.SphereHandleCap(0, player.scenePosition, Quaternion.identity, 0.5f, EventType.Repaint);

        // 绘制名字标签
        Handles.Label(player.scenePosition + Vector3.up * 0.6f, "Scene Position");
    }
}
效果:
- 注意,这里必须要选择这个物体,才会在 Scene 中进行绘制,和下面要介绍的 Gizmo 是有区别的。
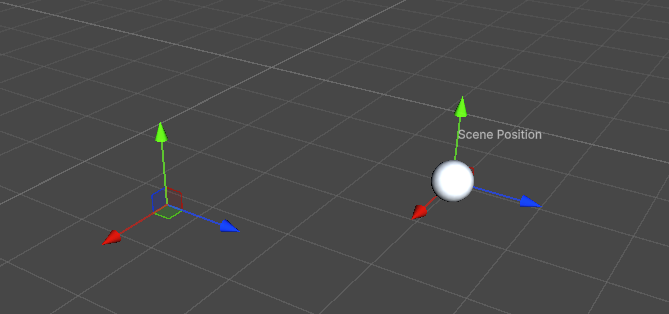
这个坐标还是可以在 Inspector 中直接编辑的,不影响这一点。
2.8 Gizmos / OnDrawGizmos
Handles 只能在 Scene 中进行绘制,而且必须要选中。
Gizmos 可以同时在 Scene 和 Game 中绘制并显示,准确来说这个知识是不算是 Editor 开发里面的,这里只是对比讲解下 Handles。
| 方法 | 用途 |
|---|---|
Gizmos.DrawLine(start, end) | 绘制直线 |
Gizmos.DrawRay(origin, direction) | 绘制射线 |
Gizmos.DrawSphere(center, radius) | 绘制球体 |
Gizmos.DrawCube(center, size) | 绘制方块 |
Gizmos.DrawWireCube(center, size) | 绘制空心方块 |
Gizmos.color | 设置颜色 |
Gizmos.DrawIcon(position, iconName, allowScaling) | 绘制图标 |
还是回到 PlayerSettings,我们的目标是用 Gizmos 显示它:
using UnityEngine;
public class PlayerSettings : MonoBehaviour
{
[SerializeField, Range(0, 10)]
private float moveSpeed = 5f;
[SerializeField]
private string playerName = "Hero";
[SerializeField]
private Color playerColor = Color.cyan;
[SerializeField]
private bool isGodMode = false;
public Vector3 scenePosition = Vector3.zero;
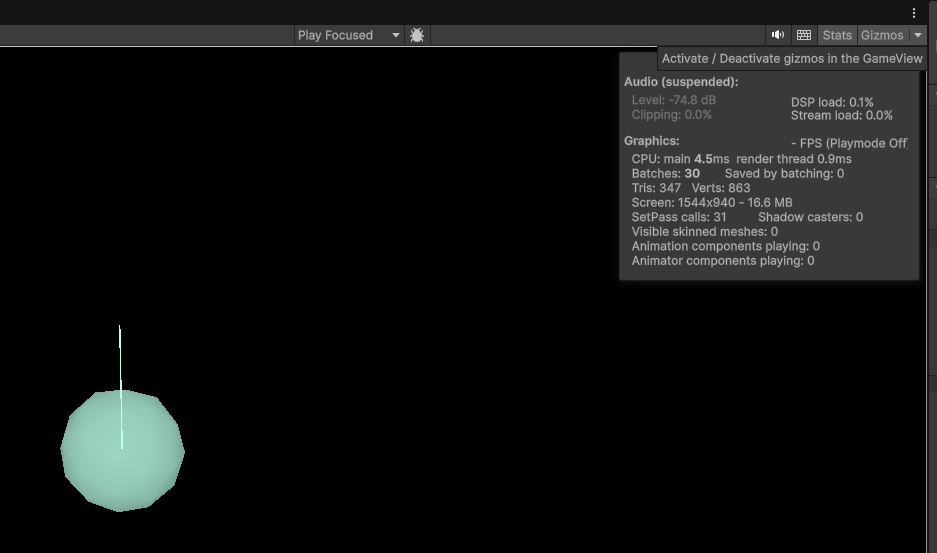
private void OnDrawGizmos()
{
Gizmos.color = playerColor;
// 绘制球体
Gizmos.DrawSphere(scenePosition, 0.5f);
// 绘制一条向上的线
Gizmos.DrawLine(scenePosition, scenePosition + Vector3.up);
// 绘制名字标签(Scene 中仅显示)
UnityEditor.Handles.Label(scenePosition + Vector3.up * 0.6f, playerName);
}
}
可以在 Game 中也看到,注意要把右上角的 Gizmos 给启用才能看到:
3. 工具类
3.1 EditorUtility
EditorUtility 是 Unity 编辑器提供的 实用工具类,用来完成一些通用编辑器操作,比如弹窗、标记对象修改、保存等。
下面的 SetDirty 经常用到。
| 方法 | 功能 |
|---|---|
EditorUtility.SetDirty(Object obj) | 标记对象已修改,确保编辑器保存更改 |
EditorUtility.DisplayDialog(title, message, ok, cancel) | 弹出对话框 |
EditorUtility.DisplayProgressBar(title, info, progress) | 显示进度条 |
EditorUtility.ClearProgressBar() | 关闭进度条 |
EditorUtility.FocusProjectWindow() | 聚焦 Project 窗口 |
EditorUtility.CopySerialized(Object src, Object dst) | 复制对象数据 |
using UnityEditor;
using UnityEngine;

public class EditorUtilityExample
{
    [MenuItem("Tools/Mark Dirty Example")]
    static void MarkDirtyExample()
    {
        GameObject go = Selection.activeGameObject;
        if (go != null)
        {
            Undo.RecordObject(go, "Modify GameObject");
            go.transform.position = Vector3.one;
            EditorUtility.SetDirty(go); // 标记修改
            Debug.Log("GameObject position changed and marked dirty.");
        }
    }
}
3.2 AssetDatabase
AssetDatabase 是 Unity 的资源管理接口,用于操作项目中的资源(创建、删除、导入、查找等)。
| 方法 | 功能 |
|---|---|
AssetDatabase.CreateAsset(Object asset, string path) | 创建资源文件 |
AssetDatabase.DeleteAsset(string path) | 删除资源文件 |
AssetDatabase.MoveAsset(string oldPath, string newPath) | 移动/重命名资源 |
AssetDatabase.LoadAssetAtPath<T>(string path) | 加载资源 |
AssetDatabase.Refresh() | 刷新资源数据库 |
AssetDatabase.GetAssetPath(Object obj) | 获取资源路径 |
using UnityEditor;
using UnityEngine;

public class AssetDatabaseExample
{
    [MenuItem("Tools/Create Material")]
    static void CreateMaterial()
    {
        Material mat = new Material(Shader.Find("Standard"));
        AssetDatabase.CreateAsset(mat, "Assets/NewMaterial.mat");
        AssetDatabase.SaveAssets();
        AssetDatabase.Refresh();
        Debug.Log("Material created in Assets folder.");
    }
}
3.3 Selection
Selection 用来 获取或设置编辑器当前选中的对象,常用在编辑器工具中操作用户选择的对象。
| 属性 / 方法 | 功能 |
|---|---|
Selection.activeObject | 当前选中的对象(单选) |
Selection.activeGameObject | 当前选中的 GameObject(单选) |
Selection.objects | 当前选中的所有对象(多选) |
Selection.gameObjects | 当前选中的所有 GameObject(多选) |
Selection.activeTransform | 当前选中对象的 Transform |
Selection.activeInstanceID | 当前选中对象的实例 ID |
using UnityEditor;
using UnityEngine;

public class SelectionExample
{
    [MenuItem("Tools/Print Selected Objects")]
    static void PrintSelectedObjects()
    {
        foreach (var obj in Selection.objects)
        {
            Debug.Log("Selected object: " + obj.name);
        }
    }
}
3.4 EditorWindow.OnGUI
每当 Unity 需要绘制界面(Inspector、EditorWindow、Game GUI等)时,就会自动调用 OnGUI(),让你用代码即时画出 UI 控件。
| 上下文 | 触发方式 | 用途 |
|---|---|---|
| MonoBehaviour.OnGUI() | 游戏运行时调用 | 绘制简单 HUD、调试 GUI |
| EditorWindow.OnGUI() | 编辑器窗口 | 绘制自定义工具窗口 |
| Editor.OnInspectorGUI() | Inspector 面板 | 自定义组件的 Inspector |
| EditorApplication.projectWindowItemOnGUI | Project 窗口绘制 | 绘制资源背景/图标 |
| EditorApplication.projectWindowItemInstanceOnGUI | Project 窗口绘制 | 绘制资源背景/图标,可以处理子资产 |
| EditorApplication.hierarchyWindowItemOnGUI | Hierarchy 绘制 | 修改 GameObject 显示效果 |
利用 EditorWindow 的 GUI 创建一个窗口:
using UnityEditor;
using UnityEngine;

public class SimpleWindow : EditorWindow
{
    [MenuItem("Window/Simple GUI")]
    public static void ShowWindow()
    {
        GetWindow<SimpleWindow>("Simple GUI");
    }

    void OnGUI()
    {
        GUILayout.Label("Hello Unity IMGUI!", EditorStyles.boldLabel);
        if (GUILayout.Button("Click Me"))
        {
            Debug.Log("Button clicked!");
        }
    }
}
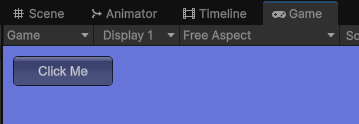
实现效果:
3.5 projectWindowItemOnGUI
projectWindowItemOnGUI 是 Unity Editor 提供的一个 静态回调事件,用于在 Project 窗口的每个资源条目上绘制自定义 GUI。
注意这里要注销一下上次注册的,这是一个比较好的习惯。
using UnityEngine;
using UnityEditor;

[InitializeOnLoad]
public static class ProjectWindowDecorator
{
    static ProjectWindowDecorator()
    {
        EditorApplication.projectWindowItemOnGUI -= OnProjectWindowItemGUI;
        EditorApplication.projectWindowItemOnGUI += OnProjectWindowItemGUI;
    }

    private static void OnProjectWindowItemGUI(string guid, Rect rect)
    {
        string path = AssetDatabase.GUIDToAssetPath(guid);

        // 只对 png 文件生效
        if (path.EndsWith(".png"))
        {
            // 在资源右上角画一个红色小圆点
            Rect dotRect = new Rect(rect.xMax - 10, rect.y + 2, 8, 8);
            EditorGUI.DrawRect(dotRect, Color.red);
        }
    }
}
效果:
还可以实现给每个文件上加一个按钮的功能:
3.6 EditorPrefs
EditorPrefs 是 Unity 编辑器专用的一个类,用来在本地保存编辑器级别的配置数据(类似于“编辑器偏好设置”)。
它的功能类似于 PlayerPrefs(游戏运行时存储),但用于编辑器工具或插件的设置。
它不会随着 “项目移动” 而迁移,也就是仅仅是你本机电脑保存的。
通常不用这个,如果有需要的话,应该是写成一个可以保存的 JSON 之类的,跟着项目可以同步。
using UnityEditor;
using UnityEngine;

public class EditorPrefsExample
{
    [MenuItem("Tools/EditorPrefs 示例")]
    public static void Example()
    {
        // 保存数据
        EditorPrefs.SetString("MyTool_LastFilePath", "D:/MyProject/Config.txt");
        EditorPrefs.SetInt("MyTool_UseDarkTheme", 1);
        EditorPrefs.SetBool("MyTool_ShowTips", true);
        EditorPrefs.SetFloat("MyTool_Volume", 0.8f);

        // 读取数据
        string path = EditorPrefs.GetString("MyTool_LastFilePath", "未设置");
        bool showTips = EditorPrefs.GetBool("MyTool_ShowTips", false);
        float volume = EditorPrefs.GetFloat("MyTool_Volume", 1.0f);

        Debug.Log($"路径: {path}, 是否显示提示: {showTips}, 音量: {volume}");

        // 删除数据
        EditorPrefs.DeleteKey("MyTool_LastFilePath");

        // 检查是否存在
        if (EditorPrefs.HasKey("MyTool_UseDarkTheme"))
            Debug.Log("暗色主题设置存在");
    }
}
3.7 MonoBehaviour.OnGUI
严格来说这个也不算 Editor 开发,但是这个很适合制作一些测试用只在 Editor 运行游戏时使用的按钮,比如下面的代码:
using UnityEngine;

public class TestMonoOnGUI : MonoBehaviour
{
#if UNITY_EDITOR
    void OnGUI()
    {
        if (GUI.Button(new Rect(10, 10, 100, 30), "Click Me"))
        {
            Debug.Log("按钮被点击了!");
        }
    }
#endif
}
运行后能出现一个按钮,并且这个按钮因为宏限制在了只能用于编辑器运行的情况,不会影响正式游戏。
4 MenuItem
4.1 顶部菜单栏
MenuItem 是 Unity 提供的一个 编辑器注解,用于在菜单栏或右键菜单中添加自定义功能。
如果路径是不以 Assets/ 或 GameObject/ 开头,Unity 会把它放在顶部菜单栏。
using UnityEditor;
using UnityEngine;
public class MenuExample
{
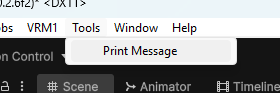
[MenuItem("Tools/Print Message")]
public static void PrintMessage()
{
Debug.Log("Hello from Tools menu!");
}
[MenuItem("Tools/Print Message", true)] // 验证函数(用于启用/禁用菜单项)
public static bool ValidatePrintMessage()
{
return Application.isPlaying == false; // 仅在非运行状态可用
}
}
在上方出现:
说明:
- [MenuItem(“Tools/Print Message”)] 会在 Unity 菜单栏的 Tools 下添加一个 “Print Message” 菜单项。
[MenuItem("路径", true)]带有 true 参数的表示同名方法是验证函数,用来控制菜单是否可用,如果返回 false 那么会是灰色 不可点击状态 。- 方法必须是 static。
第三项是 优先级 ,控制菜单在同级菜单中的排序,数字越小越靠上。
[MenuItem("Tools/Print Debug", false, 10)]
4.2 右键菜单栏
Assets/ 开头可以在 Project 窗口中右键出现,而 GameObject/ 开头可以在 Hierarchy 里面出现。
这里实现下面一个功能:
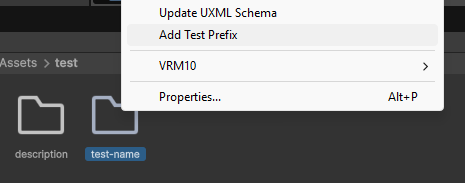
- 在
Project窗口右键文件夹时显示菜单,多选时也能生效,并对文件夹名字加上test-前缀(如果没有的话)
using UnityEngine;
using UnityEditor;

public class AddTestPrefix
{
    // 右键菜单显示在 Project 窗口文件夹上
    [MenuItem("Assets/Add Test Prefix", true)]
    private static bool ValidateAddTestPrefix()
    {
        // 只允许选中文件夹
        foreach (var obj in Selection.objects)
        {
            string path = AssetDatabase.GetAssetPath(obj);
            if (!AssetDatabase.IsValidFolder(path))
                return false;
        }
        return Selection.objects.Length > 0;
    }

    [MenuItem("Assets/Add Test Prefix")]
    private static void AddPrefix()
    {
        foreach (var obj in Selection.objects)
        {
            string path = AssetDatabase.GetAssetPath(obj);
            if (!AssetDatabase.IsValidFolder(path))
                continue;

            string folderName = System.IO.Path.GetFileName(path);
            if (!folderName.StartsWith("test"))
            {
                string newFolderName = "test-" + folderName;
                string parentPath = System.IO.Path.GetDirectoryName(path).Replace("\\", "/");
                string newPath = parentPath + "/" + newFolderName;

                AssetDatabase.RenameAsset(path, newFolderName);
                Debug.Log($"Renamed folder: {folderName} -> {newFolderName}");
            }
        }

        AssetDatabase.SaveAssets();
        AssetDatabase.Refresh();
    }
}
演示:
5. 风格美化
5.1 True/False 变开关按钮
如果我们期望实现一个开关按钮,而不是勾选,怎么做呢?
包括水平布局,更改按钮的背景颜色,
代码:
using UnityEditor;
using UnityEngine;

[CustomEditor(typeof(PlayerSettings))]
public class PlayerSettingsEditor : Editor
{
    private SerializedProperty moveSpeed;
    private SerializedProperty playerName;
    private SerializedProperty playerColor;
    private SerializedProperty isGodMode;

    private void OnEnable()
    {
        moveSpeed = serializedObject.FindProperty("moveSpeed");
        playerName = serializedObject.FindProperty("playerName");
        playerColor = serializedObject.FindProperty("playerColor");
        isGodMode = serializedObject.FindProperty("isGodMode");
    }

    public override void OnInspectorGUI()
    {
        serializedObject.Update();

        // 基础属性
        EditorGUILayout.PropertyField(playerName);
        EditorGUILayout.PropertyField(moveSpeed);
        EditorGUILayout.PropertyField(playerColor);

        EditorGUILayout.Space();

        // ----------------- 按钮靠右 -----------------
        EditorGUILayout.BeginHorizontal();

        // 左侧标签
        EditorGUILayout.LabelField("God Mode");

        // 中间占位,使按钮靠右
        GUILayout.FlexibleSpace();

        // 右侧按钮
        GUI.backgroundColor = isGodMode.boolValue ? Color.green : Color.red;

        if (GUILayout.Button(isGodMode.boolValue ? "ON" : "OFF", GUILayout.Width(50)))
        {
            isGodMode.boolValue = !isGodMode.boolValue;
            EditorUtility.SetDirty(target);
        }

        EditorGUILayout.EndHorizontal();

        serializedObject.ApplyModifiedProperties();
    }
}
5.2 全局样式替换
也许你会想说,那么能不能把所有地方的 bool 都替换了?
Editor 确实给了我们这种接口:
代码:
using UnityEditor;
using UnityEngine;

// ✅ 作用于所有 bool 字段
[CustomPropertyDrawer(typeof(bool))]
public class GlobalBoolButtonDrawer : PropertyDrawer
{
    public override void OnGUI(Rect position, SerializedProperty property, GUIContent label)
    {
        // 只处理 bool
        if (property.propertyType != SerializedPropertyType.Boolean)
        {
            EditorGUI.PropertyField(position, property, label, true);
            return;
        }

        // ---------------- 绘制布局 ----------------
        var labelRect = new Rect(position.x, position.y, EditorGUIUtility.labelWidth, position.height);
        var buttonRect = new Rect(position.x + EditorGUIUtility.labelWidth + 5, position.y, 50, position.height);

        // 标签
        EditorGUI.LabelField(labelRect, label);

        // 按钮颜色
        var oldColor = GUI.backgroundColor;
        GUI.backgroundColor = property.boolValue ? Color.green : Color.red;

        // 按钮样式
        if (GUI.Button(buttonRect, property.boolValue ? "ON" : "OFF"))
        {
            property.boolValue = !property.boolValue;
        }

        GUI.backgroundColor = oldColor;
    }

    public override float GetPropertyHeight(SerializedProperty property, GUIContent label)
    {
        return EditorGUIUtility.singleLineHeight + EditorGUIUtility.standardVerticalSpacing;
    }
}
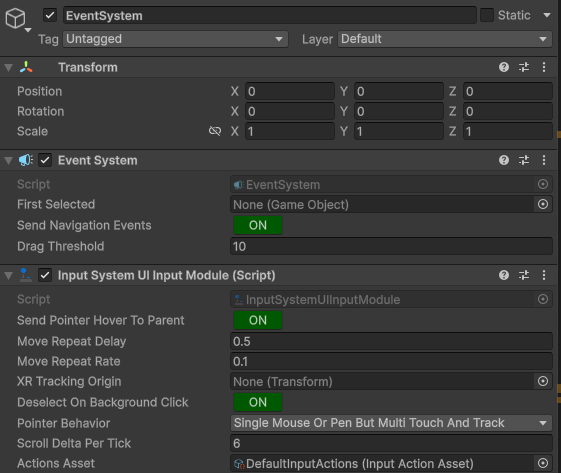
回到界面中,可以看到,连 Event System 这种地方,也直接改了:
5.3 Hierarchy 美化
利用 EditorApplication.hierarchyWindowItemOnGUI 可以实现绘制 Hierarchy 的时候进行一些自定义操作。
例如实现下面的变色功能:

配合持久化实现改变色彩功能。
代码:
using UnityEditor;
using UnityEngine;

[InitializeOnLoad]
public class HierarchyCustomDrawer
{
    private const string PrefixName = ":";

    // EditorPrefs Key
    private const string BackgroundColorKey = "HierarchyBackgroundColor";
    private const string TextColorKey = "HierarchyTextColor";

    // 默认颜色
    public static Color BackgroundColor = Color.magenta;
    public static Color TextColor = Color.white;

    static HierarchyCustomDrawer()
    {
        LoadColors();
        EditorApplication.hierarchyWindowItemOnGUI -= OnHierarchyGUI;
        EditorApplication.hierarchyWindowItemOnGUI += OnHierarchyGUI;
    }

    private static void LoadColors()
    {
        // 读取背景色
        string bgStr = EditorPrefs.GetString(BackgroundColorKey, "FF00FF"); // 默认紫色
        if (!ColorUtility.TryParseHtmlString("#" + bgStr, out BackgroundColor))
        {
            BackgroundColor = Color.magenta;
        }

        // 读取文字色
        string textStr = EditorPrefs.GetString(TextColorKey, "FFFFFF"); // 默认白色
        if (!ColorUtility.TryParseHtmlString("#" + textStr, out TextColor))
        {
            TextColor = Color.white;
        }
    }

    static void OnHierarchyGUI(int instanceID, Rect selectionRect)
    {
        GameObject obj = EditorUtility.InstanceIDToObject(instanceID) as GameObject;
        if (obj == null) return;

        if (obj.name.StartsWith(PrefixName))
        {
            // 绘制背景
            Rect backgroundRect = new Rect(0, selectionRect.y, Screen.width, selectionRect.height);
            EditorGUI.DrawRect(backgroundRect, BackgroundColor);

            // 绘制文字
            string name = obj.name.Substring(PrefixName.Length).Trim();
            GUIStyle style = new GUIStyle(EditorStyles.label)
            {
                alignment = TextAnchor.MiddleCenter,
                fontStyle = FontStyle.Bold,
                wordWrap = true,
                normal = { textColor = TextColor }
            };
            EditorGUI.LabelField(backgroundRect, name, style);
        }
    }

    // 菜单打开窗口
    [MenuItem("Tools/Hierarchy 高亮设置")]
    public static void OpenColorSettings()
    {
        HierarchyColorWindow.ShowWindow();
    }
}

public class HierarchyColorWindow : EditorWindow
{
    private Color backgroundColor;
    private Color textColor;

    public static void ShowWindow()
    {
        var window = GetWindow<HierarchyColorWindow>("Hierarchy 高亮设置");
        window.minSize = new Vector2(250, 100);
        window.LoadCurrentColors();
    }

    private void LoadCurrentColors()
    {
        backgroundColor = HierarchyCustomDrawer.BackgroundColor;
        textColor = HierarchyCustomDrawer.TextColor;
    }

    private void OnGUI()
    {
        GUILayout.Label("自定义 Hierarchy 高亮颜色", EditorStyles.boldLabel);

        backgroundColor = EditorGUILayout.ColorField("背景色", backgroundColor);
        textColor = EditorGUILayout.ColorField("文字色", textColor);

        if (GUILayout.Button("应用"))
        {
            // 保存到 EditorPrefs(字符串)
            EditorPrefs.SetString("HierarchyBackgroundColor", ColorUtility.ToHtmlStringRGBA(backgroundColor));
            EditorPrefs.SetString("HierarchyTextColor", ColorUtility.ToHtmlStringRGBA(textColor));

            // 更新静态变量
            HierarchyCustomDrawer.BackgroundColor = backgroundColor;
            HierarchyCustomDrawer.TextColor = textColor;

            // 刷新 Hierarchy
            EditorApplication.RepaintHierarchyWindow();
        }
    }
}
5.4 设置组件图标
使用 EditorGUIUtility.SetIconForObject 来给一个资产设置图标,但是这个是对 C# 是不行的,重新打开就没了。
正确的方法是用 MonoImporter.SetIcon 和 monoImporter.SaveAndReimport 来持久化,这样同时组件图标也改了。

组件中样式:
代码:
using UnityEngine;
using UnityEditor;

public class AssetIconSelectorWindow : EditorWindow
{
    private Texture2D selectedIcon;

    [MenuItem("Tools/Set Asset Icon Window")]
    public static void ShowWindow()
    {
        GetWindow<AssetIconSelectorWindow>("Set Asset Icon");
    }

    private void OnGUI()
    {
        GUILayout.Label("批量设置资产图标", EditorStyles.boldLabel);

        // 获取当前选中的所有资产
        Object[] selectedAssets = Selection.objects;

        // 显示选中的资产列表
        if (selectedAssets.Length == 0)
        {
            EditorGUILayout.LabelField("未选择资产");
        }
        else
        {
            EditorGUILayout.LabelField($"选中 {selectedAssets.Length} 个资产:");
            foreach (Object asset in selectedAssets)
            {
                EditorGUILayout.LabelField(" - " + asset.name);
            }
        }

        // 选择图标
        selectedIcon = (Texture2D)EditorGUILayout.ObjectField("图标", selectedIcon, typeof(Texture2D), false);

        GUILayout.Space(10);

        if (GUILayout.Button("应用图标到选中资产"))
        {
            ApplyIcon(selectedAssets);
        }
    }

    private void ApplyIcon(Object[] assets)
    {
        if (assets == null || assets.Length == 0)
        {
            EditorUtility.DisplayDialog("错误", "请先在 Project 面板选择一个或多个资产", "确定");
            return;
        }
        if (selectedIcon == null)
        {
            EditorUtility.DisplayDialog("错误", "请选择一个图标", "确定");
            return;
        }

        int appliedCount = 0;

        foreach (Object asset in assets)
        {
            string path = AssetDatabase.GetAssetPath(asset);
            if (string.IsNullOrEmpty(path))
                continue;

            // 持久化设置
            var importer = AssetImporter.GetAtPath(path) as MonoImporter;
            if (importer != null)
            {
                importer.SetIcon(selectedIcon);
                importer.SaveAndReimport();
                appliedCount++;
            }
        }

        EditorUtility.DisplayDialog("完成", $"图标已应用到 {appliedCount} 个资产", "确定");
    }
}
6. 自定义类型
一个极其常见的需求:导入一个自定义的文件,例如 “.vrm” 等。这些是如何处理的呢?
这里以 “.hhh” 为例,它是一个纯文本文件,只有 2 行,第一行表示 name,第二行表示 description 。
6.1 ScriptableObject
导入的文件实际上上面的套了一个 ScriptableObject 才能显示,这里创建 2 个 ScriptableObject,将分别作为 .hhh 的主对象,和非主对象。
using UnityEngine;

[CreateAssetMenu(fileName = "NewHHHFile", menuName = "Custom/HHH File")]
public class HHHFile : ScriptableObject
{
    public string nameLine;
    public string descriptionLine;
}

public class HHHName : ScriptableObject
{
    public string nameLine;
}
6.2 AssetImporter 解析
然后在文件导入时,通过写 ScriptedImporter 可以实现解析过程。
创建了 HHHFile 实例并读取 name 和 description,然后将这个实例设置为主对象,同时设置了图标。
同时创建了一个 HHHName 实例,并设置为非主对象。
using UnityEngine;
using UnityEditor;
using UnityEditor.AssetImporters;
using System.IO;
[ScriptedImporter(1, "hhh")]
public class HHHImporter : ScriptedImporter
{
public override void OnImportAsset(AssetImportContext ctx)
{
// 读取文件内容
string[] lines = File.ReadAllLines(ctx.assetPath);
// 1️⃣ 主对象 HHHFile
HHHFile mainAsset = ScriptableObject.CreateInstance<HHHFile>();
mainAsset.nameLine = lines.Length > 0 ? lines[0] : "";
mainAsset.descriptionLine = lines.Length > 1 ? lines[1] : "";
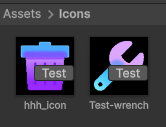
ctx.AddObjectToAsset("HHHFile", mainAsset);
ctx.SetMainObject(mainAsset);
// 设置主对象图标
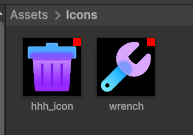
Texture2D mainIcon = AssetDatabase.LoadAssetAtPath<Texture2D>("Assets/Icons/hhh_icon.png");
if (mainIcon != null)
{
EditorGUIUtility.SetIconForObject(mainAsset, mainIcon);
}
// 2️⃣ 非主对象 HHHName
HHHName subAsset = ScriptableObject.CreateInstance<HHHName>();
subAsset.nameLine = mainAsset.nameLine;
ctx.AddObjectToAsset(subAsset.nameLine, subAsset);
// 设置非主对象图标
Texture2D subIcon = AssetDatabase.LoadAssetAtPath<Texture2D>("Assets/Icons/wrench.png");
if (subIcon != null)
{
EditorGUIUtility.SetIconForObject(subAsset, subIcon);
}
}
}
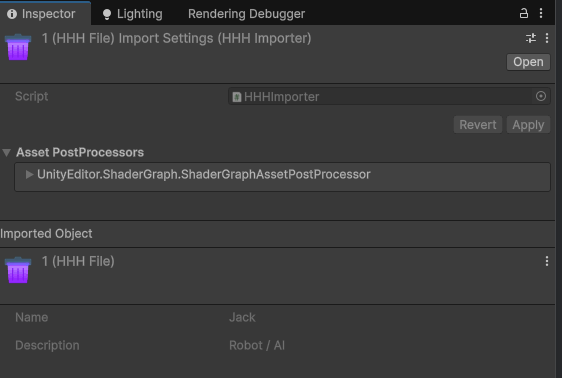
导入后效果:
能够在右侧查看 Inspector:
这里添加了一个 Inspector CustomEditor,和前面介绍的美化方式是一个意思,作用只是告诉你这个 HHHFile 一样是可以自定义 Inspector 的。
using UnityEditor;

[CustomEditor(typeof(HHHFile))]
public class HHHFileInspector : Editor
{
    public override void OnInspectorGUI()
    {
        HHHFile hhh = (HHHFile)target;

        EditorGUILayout.LabelField("Name", hhh.nameLine);

        EditorGUILayout.Space();

        EditorGUILayout.LabelField("Description", hhh.descriptionLine);
    }
}
6.3 AssetPostprocessor
任何资产的变动,即导入、删除、移动,都可以触发 OnPostprocessAllAssets。通过对这个函数的编写,能够实现一些后处理,比如自动设置导入的图片为 sprite 等。
using UnityEngine;
using UnityEditor;
using System.IO;

public class HHHFilePostprocessor : AssetPostprocessor
{
    static void OnPostprocessAllAssets(
        string[] importedAssets,
        string[] deletedAssets,
        string[] movedAssets,
        string[] movedFromAssetPaths)
    {
        foreach (string path in importedAssets)
        {
            // 只处理 .hhh 文件
            if (Path.GetExtension(path) == ".hhh")
            {
                // 读取文件内容
                string[] lines = File.ReadAllLines(path);
                string nameLine = lines.Length > 0 ? lines[0] : "";
                string descLine = lines.Length > 1 ? lines[1] : "";

                // 打印日志
                Debug.Log($"[HHHFilePostprocessor] 导入: {path}\nName: {nameLine}\nDescription: {descLine}");
            }
        }
    }
}
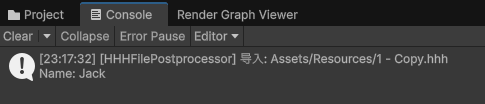
导入的时候就会打印这行信息:
7. 随机颜色
Just For Fun
给文件一个随机的颜色,根据文件名 Hash 唯一确定。
using System;
using UnityEditor;
using UnityEngine;

[InitializeOnLoad]
public static class ColorProjectWindowDecorator
{
    static ColorProjectWindowDecorator()
    {
        EditorApplication.projectWindowItemOnGUI -= OnProjectWindowItemGUI;
        EditorApplication.projectWindowItemOnGUI += OnProjectWindowItemGUI;
    }

    private static void OnProjectWindowItemGUI(string guid, Rect rect)
    {
        string path = AssetDatabase.GUIDToAssetPath(guid);

        // 只针对 .cs 文件
        if (!path.EndsWith(".cs", StringComparison.OrdinalIgnoreCase))
            return;

        // 提取文件名
        string fileName = System.IO.Path.GetFileNameWithoutExtension(path);

        // 计算一个确定性的哈希值
        int hash = fileName.GetHashCode();

        // 将哈希映射到颜色(HSV -> RGB)
        float hue = Mathf.Abs(hash % 360) / 360f; // 色相
        float saturation = 0.6f + (Mathf.Abs(hash) % 40) / 100f; // 0.6~1.0
        float value = 0.8f; // 亮度固定
        Color color = Color.HSVToRGB(hue, saturation, value);

        float size = Math.Min(rect.width, rect.height) * 0.7f;
        Rect dotRect = new Rect(
            rect.x + rect.width / 2f - size / 2f,
            rect.y + rect.height / 2f - size / 2f,
            size,
            size
        );

        DrawCircle(dotRect, color);
    }

    private static void DrawCircle(Rect rect, Color color)
    {
        // 用 Handles 绘制圆形(比方形更柔和)
        Handles.BeginGUI();
        Color oldColor = Handles.color;
        Handles.color = color;
        Handles.DrawSolidDisc(rect.center, Vector3.forward, rect.width / 2);
        Handles.color = oldColor;
        Handles.EndGUI();
    }
}