SDF 介绍
Signed Distance Field (SDF)
Signed Distance Field(有符号距离场)1是一种用于表示形状的数学函数或数据结构。
它在二维或三维空间中为每个点分配一个带符号的距离值,表示该点到最近表面(或边界)的距离,并用符号区分内外:
- 正值:点位于形状外部,数值表示距离表面的最近距离。
- 负值:点位于形状内部,绝对值表示距离表面的最近距离。
- 零:点正好位于形状的表面上。
形式化定义,对于空间中的点 $x$,SDF 可以表示为:
$$ f(x) = \begin{cases} d(x, \partial\Omega), & \text{if } x \in \Omega \\ -d(x, \partial\Omega), & \text{if } x \notin \Omega \\ 0, & \text{if } x \in \partial\Omega \end{cases} $$
其中的$\Omega$属于物体内,$\partial\Omega$表示边界,$d(x, \partial\Omega)$表示点$x$到边界的最小距离。
GitHub 仓库
如果你想查看最终的生成SDF图片的代码,可以在GitHub仓库2获取:cronrpc/Signed-Distance-Field-2D-Generator
应用
上面的说法可能非常抽象,我们看一些具体的应用实例。
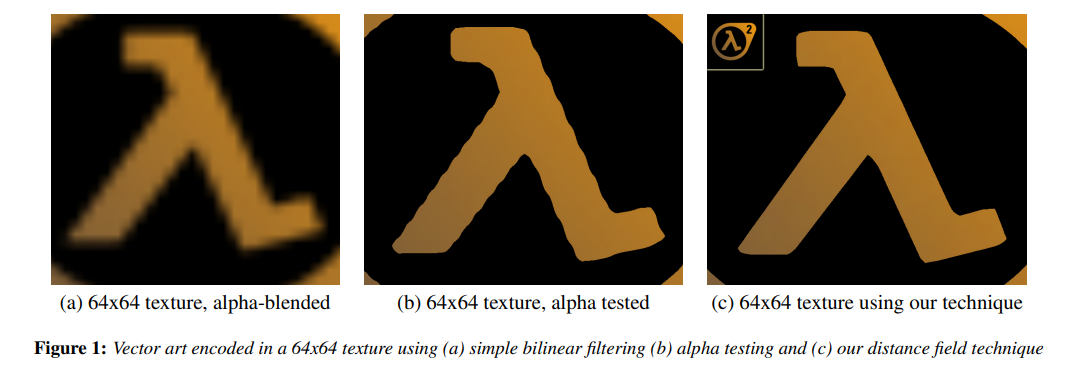
- 字体渲染(Valve 的 SDF 字体技术3),Unity的TMP字体就是使用了SDF技术。
光线追踪中的表面求交
风格化阴影、云等
凡是某种连续过渡的参数,都可以考虑使用SDF技术。
2D SDF 生成算法
对于一张灰度图,白色部分表示物体,黑色是背景。如何生成它的SDF图呢?

暴力求值法
一个最为简单的方式是,遍历算法。
- 首先我们找出所有的边界集合。也就是当前像素是白色,而周围像素有黑色的点。
- 遍历所有的点,计算距离边界集合的最近距离。
- 根据本身的黑白,添加距离的正负号。
如果假设像素点的数目是$n$,那么复杂度是$O(n^2)$。
# generator_sdf.py
import sys
import math
from PIL import Image
import numpy as np

def generate_sdf(input_path, output_path):
    # 读取灰度图(0-255)
    img = Image.open(input_path).convert("L")
    w, h = img.size
    pixels = np.array(img)

    # Step 1: 找出边界集合
    boundary_points = []
    for y in range(h):
        for x in range(w):
            if pixels[y, x] > 127:  # 白色
                # 检查周围像素是否有黑色
                neighbors = [
                    (nx, ny)
                    for nx in (x - 1, x, x + 1)
                    for ny in (y - 1, y, y + 1)
                    if 0 <= nx < w and 0 <= ny < h and not (nx == x and ny == y)
                ]
                for nx, ny in neighbors:
                    if pixels[ny, nx] <= 127:  # 黑色
                        boundary_points.append((x, y))
                        break

    # Step 2 & 3: 计算SDF
    sdf = np.zeros((h, w), dtype=np.float32)
    for y in range(h):
        for x in range(w):
            min_dist = float("inf")
            for bx, by in boundary_points:
                dist = math.sqrt((x - bx) ** 2 + (y - by) ** 2)
                if dist < min_dist:
                    min_dist = dist
            # 黑色取负值
            if pixels[y, x] <= 127:
                min_dist = -min_dist
            sdf[y, x] = min_dist

    # 归一化到0-255
    max_dist = np.max(np.abs(sdf))
    sdf_normalized = ((sdf / max_dist) + 1) * 127.5
    sdf_img = Image.fromarray(np.clip(sdf_normalized, 0, 255).astype(np.uint8))
    sdf_img.save(output_path)
    print(f"SDF saved to {output_path}")

if __name__ == "__main__":
    if len(sys.argv) != 3:
        print("Example: python generator_sdf.py test.png test_sdf.png")
        sys.exit(1)
    generate_sdf(sys.argv[1], sys.argv[2])
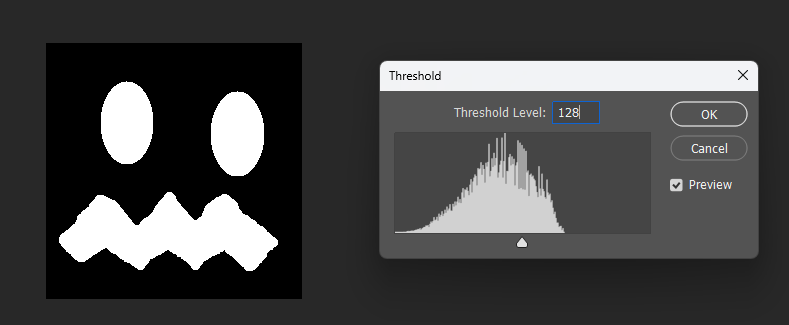
生成的结果:
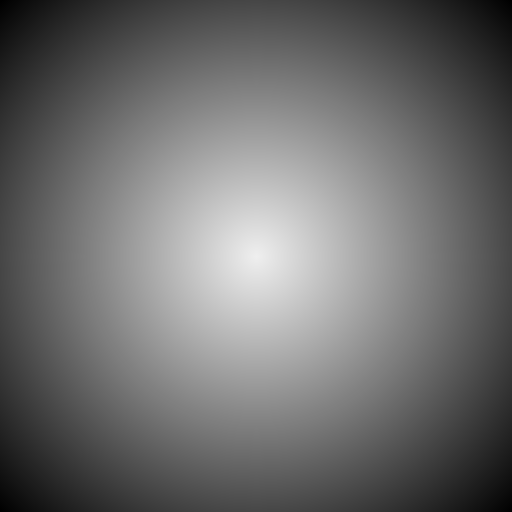
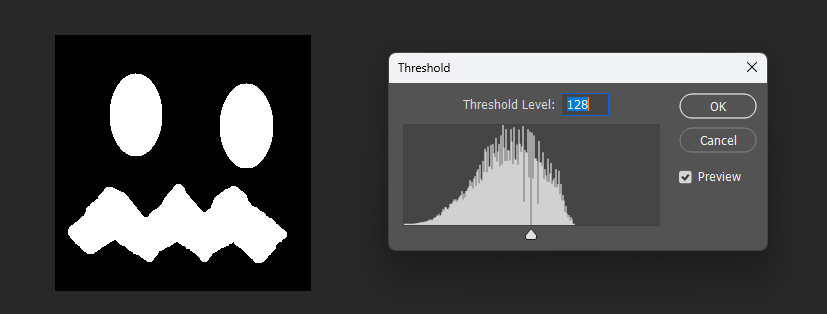
通过在PS中改变图片的显示阈值,可以观察到圆形的SDF变化:

同理在正方形的SDF中,也可以观察效果。正方形的SDF的特点就是在内部时等高线是直角,在外部时等高线是圆弧。
八邻域欧几里得近似距离
度量空间4(Metric Space)是数学中刻画“距离”这一概念的抽象框架。它由一个集合 $X$ 及其上的距离函数
$$ d : X \times X \to \mathbb{R} $$
构成,并且这个距离函数必须满足以下四个条件:
非负性:距离永远是非负数。
恒等性:距离为零时,两点必须相同。
对称性:从 $x$ 到 $y$ 的距离等于从 $y$ 到 $x$ 的距离。
三角不等式:直接到达不应比绕路更远。
$$ d(x, z) \le d(x, y) + d(y, z) $$
例如,在连续的二维平面中,欧几里得距离:
$$ d(P, Q) = \sqrt{(x_P - x_Q)^2 + (y_P - y_Q)^2} $$
是一个典型的度量函数。
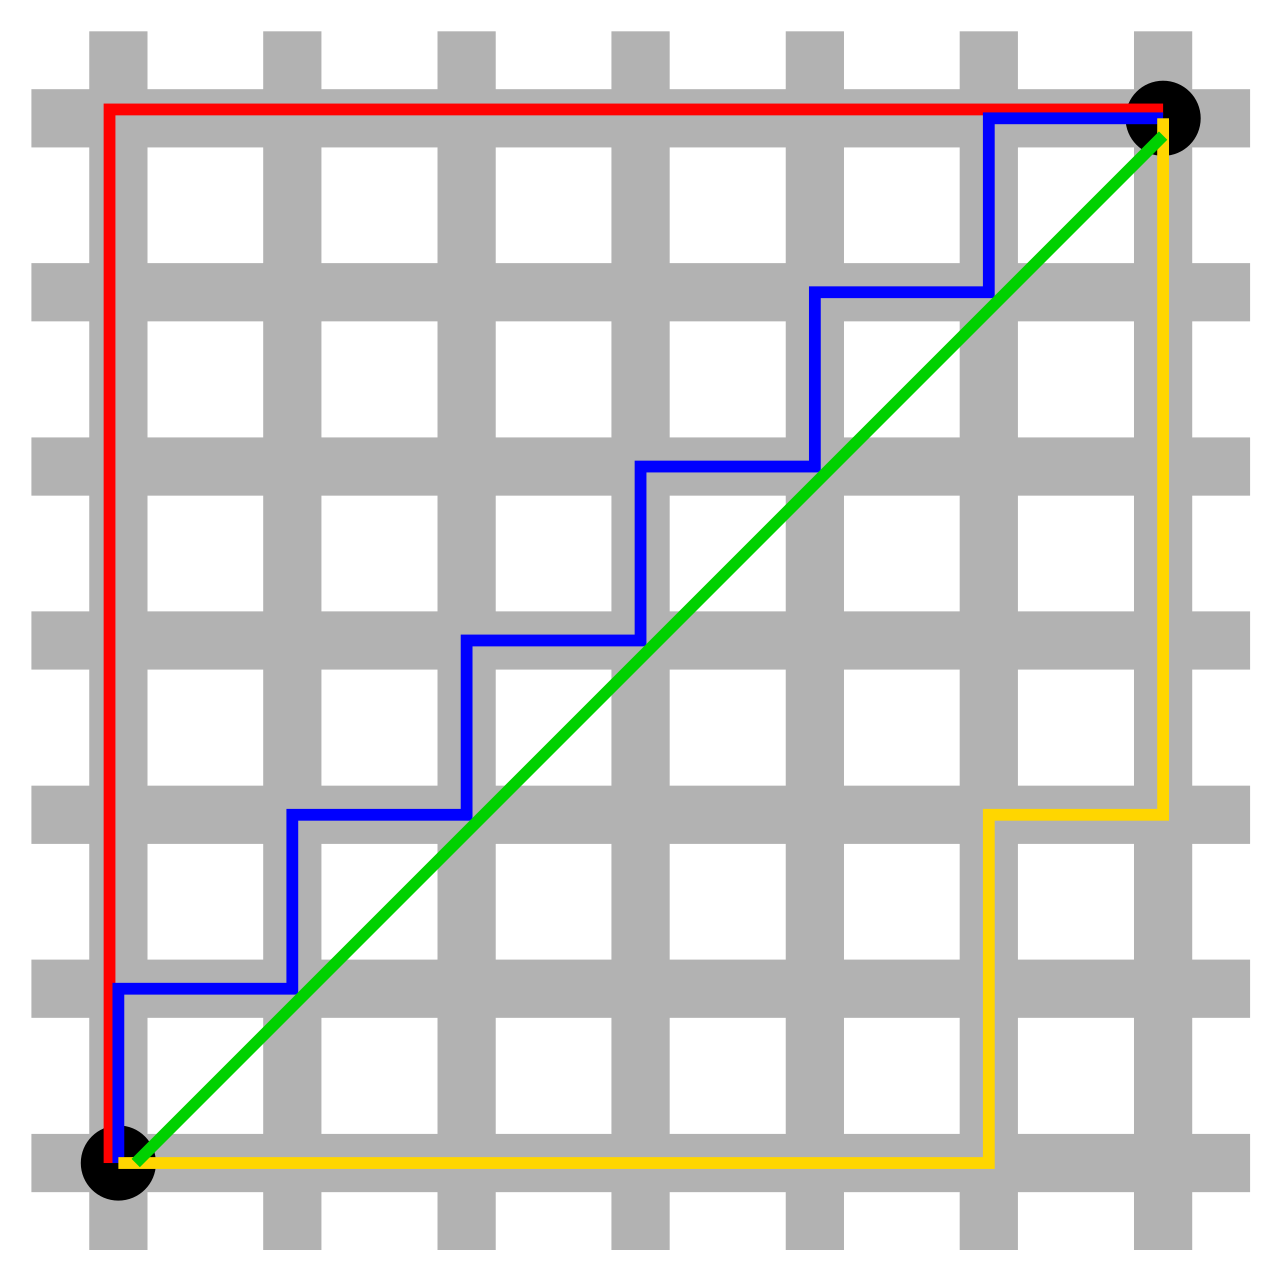
下图的蓝色线条、红色线条、黄色线条都是表示同样的长度,而绿色是比它们都短的欧几里得距离。
然而在数字图像处理或栅格地图中,我们的点是离散的像素格,距离计算可以直接用欧几里得公式,但这样需要大量平方根运算,代价较高。 为提高效率,常采用 八邻域欧几里得近似距离(8-neighborhood Euclidean approximation):
- 八邻域:指每个像素与其水平方向、垂直方向和对角线方向上最近的 8 个像素相邻。
- 在这种邻接关系下,可以用下式近似欧几里得距离:
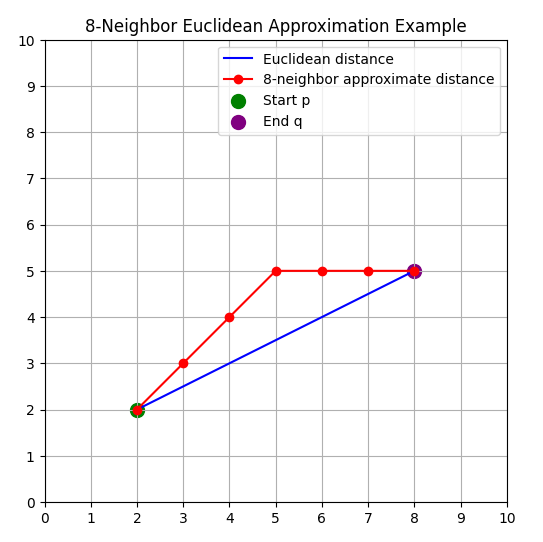
$$ d_{8}(p, q) \approx \max(\Delta x, \Delta y) + (\sqrt{2} - 1) \cdot \min(\Delta x, \Delta y) $$
其中 $\Delta x = |x_p - x_q|$,$\Delta y = |y_p - y_q|$。
例如下图中的红色就是表示八邻域欧几里得近似距离,而蓝色直线就是欧几里得距离。
这种方法避免了大量开方计算,同时在 8 邻域范围内与真实欧几里得距离的误差很小,因此常用于路径搜索(A*、Dijkstra)、距离变换、图像形态学等场景。
8SSEDT
对这个算法的介绍参考自Lisapple 8SSEDT5。
在上一小节中,我们已经介绍了八邻域欧几里得近似距离。实际上,对于图中的每个节点,其距离值可以用如下递推关系表示:
$$ f(x, y) = \min_{\substack{dx, dy \in {-1,0,1} \ (dx, dy) \neq (0,0)}} \Big( f(x+dx, y+dy) + d(dx, dy) \Big) $$
其中,$d(dx, dy)$ 表示从邻居节点 $(x+dx, y+dy)$ 移动到节点 $(x, y)$ 的代价,通常取:
$$ d(dx, dy) = \begin{cases} 1, & \text{若 } |dx| + |dy| = 1 \quad (\text{水平或垂直邻居})\\ \sqrt{2}, & \text{若 } |dx| + |dy| = 2 \quad (\text{对角邻居}) \end{cases} $$
这里,$dx$ 和 $dy$ 可以分别取 $-1, 0, 1$,但不能同时为零,这样才是邻居节点。
如果给邻居节点进行标号:
[#1][#2][#3]
[#4][ x][#5]
[#6][#7][#8]
对于任意两个点$x$和$y$之间的距离路径,只可能由下面4个组合中的1种构成,也就是说必然是其中之一的线性叠加:
1,2,4

2,3,5

4,6,7

5,7,8
所以从左上角递推到右下角,就可以覆盖第1种$1,2,4$的可能,也就是说最多$4$次遍历整个图,就能确定所有点的值。
当然,这里进行了一点优化,参考Signed Distance Fields6的实现,他选择了下列$4$个遍历路径:
   - - - >
| [?][?][?]
| [?][x][ ]
v [ ][ ][ ]

   < - - -
| [ ][ ][ ]
| [ ][x][?]
v [ ][ ][ ]

   < - - -
^ [ ][ ][ ]
| [ ][x][?]
| [?][?][?]

   - - - >
^ [ ][ ][ ]
| [?][x][ ]
| [ ][ ][ ]
这里直接给出Python的实现:
- 准确来说下列代码的距离定义是欧几里得距离,并不是八邻域欧几里得近似距离。
- 只是借鉴了移动方向为8个方向
import sys
import os
import numpy as np
from PIL import Image

INF = 9999

def dist_sq(dx, dy):
    return dx*dx + dy*dy

def compare(grid, p, x, y, ox, oy, width, height):
    nx = x + ox
    ny = y + oy
    if 0 <= nx < width and 0 <= ny < height:
        other_dx, other_dy = grid[ny, nx]
    else:
        other_dx, other_dy = INF, INF
    other_dx += ox
    other_dy += oy
    if dist_sq(other_dx, other_dy) < dist_sq(*p):
        p = (other_dx, other_dy)
    return p

def generate_sdf(grid):
    height, width, _ = grid.shape
    # Pass 0
    for y in range(height):
        for x in range(width):
            p = tuple(grid[y, x])
            p = compare(grid, p, x, y, -1,  0, width, height)
            p = compare(grid, p, x, y,  0, -1, width, height)
            p = compare(grid, p, x, y, -1, -1, width, height)
            p = compare(grid, p, x, y,  1, -1, width, height)
            grid[y, x] = p
        for x in range(width-1, -1, -1):
            p = tuple(grid[y, x])
            p = compare(grid, p, x, y, 1, 0, width, height)
            grid[y, x] = p

    # Pass 1
    for y in range(height-1, -1, -1):
        for x in range(width-1, -1, -1):
            p = tuple(grid[y, x])
            p = compare(grid, p, x, y,  1,  0, width, height)
            p = compare(grid, p, x, y,  0,  1, width, height)
            p = compare(grid, p, x, y, -1,  1, width, height)
            p = compare(grid, p, x, y,  1,  1, width, height)
            grid[y, x] = p
        for x in range(width):
            p = tuple(grid[y, x])
            p = compare(grid, p, x, y, -1, 0, width, height)
            grid[y, x] = p

def load_image_binary(path, threshold=128):
    im = Image.open(path).convert('L')
    arr = np.array(im, dtype=np.uint8)
    inside = arr < threshold
    return inside, im

def save_signed_sdf_image(signed, out_path):
    # 归一化到0-255,128为边界
    max_dist = np.max(np.abs(signed))
    if max_dist == 0:  # 防止除以0
        sdf_normalized = np.full_like(signed, 128.0)
    else:
        sdf_normalized = ((signed / max_dist) + 1.0) * 128.0
    sdf_normalized = np.clip(sdf_normalized, 0, 255).astype(np.uint8)
    out = Image.fromarray(sdf_normalized, mode='L')
    out.save(out_path)

def main():
    if len(sys.argv) < 2:
        print("Usage: python 8ssedt.py input.png")
        sys.exit(1)

    in_path = sys.argv[1]
    if not os.path.exists(in_path):
        print("File not found:", in_path)
        sys.exit(1)

    inside, im = load_image_binary(in_path)
    h, w = inside.shape
    empty = (INF, INF)
    zero = (0, 0)

    # two grids: inside distances and outside distances
    grid1 = np.zeros((h, w, 2), dtype=int)
    grid2 = np.zeros((h, w, 2), dtype=int)

    for y in range(h):
        for x in range(w):
            if inside[y, x]:
                grid1[y, x] = zero
                grid2[y, x] = empty
            else:
                grid1[y, x] = empty
                grid2[y, x] = zero

    generate_sdf(grid1)
    generate_sdf(grid2)

    dist1 = np.sqrt(grid1[:, :, 0]**2 + grid1[:, :, 1]**2)
    dist2 = np.sqrt(grid2[:, :, 0]**2 + grid2[:, :, 1]**2)
    signed = dist1 - dist2

    base, ext = os.path.splitext(in_path)
    out_path = base + "_8ssedt.png"
    save_signed_sdf_image(signed, out_path)
    print("Saved:", out_path)

if __name__ == "__main__":
    main()
我们用它实验的这张原图来看看效果:

在运行我们的脚本后,得到:
放入PS中,查看不同阈值下的效果:
Correct 8SSEDT
参考7,他解决的问题是,对于2值的黑白图来说,邻近边界的点,距离边界的距离实质上应该只有半个像素。
考虑到这半个像素的差别,会导致在接近边界的地方有一些误差,解决方法就是旁边的点是边界的时候,距离就只加一半的大小。
import sys
import os
import math
import numpy as np
from PIL import Image

FIX = True

INF = 9999

def dist_sq(dx, dy):
    return dx*dx + dy*dy

def compare(grid, p, x, y, ox, oy, width, height):
    nx = x + ox
    ny = y + oy
    if 0 <= nx < width and 0 <= ny < height:
        other_dx, other_dy = grid[ny, nx]
    else:
        other_dx, other_dy = INF, INF

    if FIX:
        if other_dx != 0 or other_dy != 0:  # 对应 other.DistSq()!=0
            ox *= 2
            oy *= 2

    other_dx += ox
    other_dy += oy
    if dist_sq(other_dx, other_dy) < dist_sq(*p):
        p = (other_dx, other_dy)
    return p

def generate_sdf(grid):
    height, width, _ = grid.shape
    # Pass 0
    for y in range(height):
        for x in range(width):
            p = tuple(grid[y, x])
            p = compare(grid, p, x, y, -1,  0, width, height)
            p = compare(grid, p, x, y,  0, -1, width, height)
            p = compare(grid, p, x, y, -1, -1, width, height)
            p = compare(grid, p, x, y,  1, -1, width, height)
            grid[y, x] = p
        for x in range(width-1, -1, -1):
            p = tuple(grid[y, x])
            p = compare(grid, p, x, y, 1, 0, width, height)
            grid[y, x] = p

    # Pass 1
    for y in range(height-1, -1, -1):
        for x in range(width-1, -1, -1):
            p = tuple(grid[y, x])
            p = compare(grid, p, x, y,  1,  0, width, height)
            p = compare(grid, p, x, y,  0,  1, width, height)
            p = compare(grid, p, x, y, -1,  1, width, height)
            p = compare(grid, p, x, y,  1,  1, width, height)
            grid[y, x] = p
        for x in range(width):
            p = tuple(grid[y, x])
            p = compare(grid, p, x, y, -1, 0, width, height)
            grid[y, x] = p

def load_image_binary(path, threshold=128):
    im = Image.open(path).convert('L')
    arr = np.array(im, dtype=np.uint8)
    inside = arr < threshold
    return inside, im

def save_signed_sdf_image(signed, out_path):
    # 归一化到0-255,128为边界
    max_dist = np.max(np.abs(signed))
    if max_dist == 0:  # 防止除以0
        sdf_normalized = np.full_like(signed, 128.0)
    else:
        sdf_normalized = ((signed / max_dist) + 1.0) * 128.0
    sdf_normalized = np.clip(sdf_normalized, 0, 255).astype(np.uint8)
    out = Image.fromarray(sdf_normalized, mode='L')
    out.save(out_path)

def main():
    if len(sys.argv) < 2:
        print("Usage: python 8ssedt.py input.png")
        sys.exit(1)

    in_path = sys.argv[1]
    if not os.path.exists(in_path):
        print("File not found:", in_path)
        sys.exit(1)

    inside, im = load_image_binary(in_path)
    h, w = inside.shape
    empty = (INF, INF)
    zero = (0, 0)

    # two grids: inside distances and outside distances
    grid1 = np.zeros((h, w, 2), dtype=int)
    grid2 = np.zeros((h, w, 2), dtype=int)

    for y in range(h):
        for x in range(w):
            if inside[y, x]:
                grid1[y, x] = zero
                grid2[y, x] = empty
            else:
                grid1[y, x] = empty
                grid2[y, x] = zero

    generate_sdf(grid1)
    generate_sdf(grid2)

    dist1 = np.sqrt(grid1[:, :, 0]**2 + grid1[:, :, 1]**2)
    dist2 = np.sqrt(grid2[:, :, 0]**2 + grid2[:, :, 1]**2)

    if FIX:
        signed = 0.5 * (dist1 - dist2)
    else:
        signed = dist1 - dist2

    base, ext = os.path.splitext(in_path)
    out_path = base + "_8ssedt_correct.png"
    save_signed_sdf_image(signed, out_path)
    print("Saved:", out_path)

if __name__ == "__main__":
    main()
从效果上看,几乎是和之前一样:

但是从阈值角度来看,会稍微平滑一些,观察接近地方的值就知道了。
修正后的结果:
原来的结果:
为什么还是用欧几里得距离?
用公式:
$$ d_8(p,q) = \max(\Delta x,\Delta y) + (\sqrt{2} - 1) \cdot \min(\Delta x,\Delta y) $$
如果取两个点:$(1,4)$ 和 $(3,3)$
计算 $d_8$
$d_8(1,4) = 4 + (\sqrt{2} - 1) \cdot 1 \approx 4 + 0.4142 = 4.4142$
$d_8(3,3) = 3 + (\sqrt{2} - 1) \cdot 3 \approx 3 + 1.2426 = 4.2426$
⇒ $d_8(1,4) > d_8(3,3)$
计算欧几里得距离
$d_E(1,4) = \sqrt{1^2 + 4^2} = \sqrt{17} \approx 4.1231$
$d_E(3,3) = \sqrt{3^2 + 3^2} = \sqrt{18} \approx 4.2426$
⇒ $d_E(1,4) < d_E(3,3)$
这个反例说明:$d_8$ 的排序不一定和欧几里得距离的排序一致,因此这里只是借鉴了八邻域的位移,但是两个点之间的距离还是按照欧几里得距离来计算。
scipy.ndimage 库
前面用到的算法用Python写的还是太慢了,尤其是循环嵌套,在2048x2048开始速度会比较慢。
scipy的图像处理底层采用C++来编写,速度会快非常多。
下面代码的scale采用8(后面会说为什么不要使用normalize,而是用固定比例的缩放),同时输出采用16bit(而不是8bit)的灰度图。
import sys
import os
import numpy as np
from PIL import Image
from scipy import ndimage

scale = 8

def load_image_binary(path, threshold=128):
    im = Image.open(path).convert('L')
    arr = np.array(im, dtype=np.uint8)
    inside = arr < threshold
    return inside

def save_sdf_16bit(signed, out_path):
    # 直接转 uint16 保存,不做归一化
    signed = signed * scale + 32767.5
    signed_uint16 = np.clip(signed, 0, 65535).astype(np.uint16)
    out = Image.fromarray(signed_uint16, mode='I;16')
    out.save(out_path)

def fast_signed_sdf(mask):
    dist_inside = ndimage.distance_transform_edt(mask)
    dist_outside = ndimage.distance_transform_edt(~mask)
    return dist_outside - dist_inside  # inside 正,outside 负

def main():
    if len(sys.argv) < 2:
        print("Usage: python fast_sdf.py input1.png [input2.png ...]")
        sys.exit(1)

    for in_path in sys.argv[1:]:
        if not os.path.exists(in_path):
            print("File not found:", in_path)
            continue

        inside = load_image_binary(in_path)
        signed = fast_signed_sdf(inside)

        base, _ = os.path.splitext(in_path)
        out_path = base + "_sdf16.png"
        save_sdf_16bit(signed, out_path)
        print(f"Saved SDF to {out_path}")

if __name__ == "__main__":
    main()
16bit 和 scale
前面使用了归一化距离的方式,但是如果希望合成多张图片,需要将距离的单位统一(因为需要在两张图片之间进行插值)。
第二,如果图片尺寸非常大(2048),那么8bit只有256大小,就不够表示所有距离了,为了避免距离截断导致效果不好,采用16bit的png来存储距离。
2048x2048大小的图片,两点间的最大距离是$2048*1.414=2,896$,同时16bit可以表示的最大范围是+-32767,所以可以选择$scale=8$或者$10$来表示。
scale = 10
# 缩放到 0–65535,32767.5 为边界
unsigned = signed * scale + 32767.5
unsigned = np.clip(unsigned, 0, 65535).astype(np.uint16)
合成算法
怎么合成图片,取决于我们到底想实现什么样的效果。
比如如果是想实现一个 subtraction 的效果,是不是直接把距离做减法就可以了呢?
这种做法确实可以实现在中点处表现为减法,但是最左侧和左右侧的含义实际上是不明确的。
# 布尔运算
def sdf_union(d1, d2):
    return np.minimum(d1, d2)  # 并集

def sdf_intersection(d1, d2):
    return np.maximum(d1, d2)  # 交集

def sdf_subtraction(d1, d2):
    return np.maximum(d1, -d2) # A 减 B
类似上面代码的合并的实际含义是:当处在阈值中点的时候,表现为并、交或者减法。
插值思路

在游戏中,实质上追求的是这样一个过程,假如有两张图片a和b,我们希望在阈值最大的时候图片就是a的图案,阈值最小的时候图片就是b的图案。
如果是三张图片,那就是最大值是a的图案,中间时就是b的图案,最小值时就是c的图案,以此类推。
这里还需要限制一个条件,那就是它们必须是完全包含的关系,也就是$c \supset b \supset a$,只有这样才可能实现这个过程。
对于图片a和b,由于包含关系,物体a上的任意一个像素,在a和b中的距离值都应该是正数,也就是在物体内部。
对于$b-a$上的一个点$x$,在a中一定是负数$x_a$(外侧),在b中是正数$x_b$。所以$x$这个点在最终图像上的值$x_{final}$,实际上就应该是$x$从$x_b$插值到$x_a$过程中,$x=0$时刻对应的阈值的大小。
比如,如果$x$在${sdf}_a$的值是$-3$,在${sdf}_b$的值是$3$。
那么${x}_{final}$的大小在8bit灰度图下就应该是128,这样刚好在阈值128以下都能点亮这个像素。
所以,核心的思路就是找对应的0点。
蒙特卡洛插值法
这里参考了这篇文章8的算法,通过采样方式来寻找0点。
注意,在Python下这种嵌套循环运行速度是非常慢的,超过2048尺寸的图片不适合用纯Python来写。
import sys
import numpy as np
from PIL import Image

if len(sys.argv) != 3:
    print("用法: python compose2.py a.png b.png")
    sys.exit(1)

# 读取 16bit 灰度图
def load_16bit_gray(path):
    img = Image.open(path)
    arr = np.array(img, dtype=np.uint16)
    return arr

sdf1 = load_16bit_gray(sys.argv[1])
sdf2 = load_16bit_gray(sys.argv[2])

# 检查尺寸一致
if sdf1.shape != sdf2.shape:
    raise ValueError("两张输入图片的尺寸必须相同")

height, width = sdf1.shape
output = np.zeros((height, width), dtype=np.uint16)

THRESHOLD = 32768   # 16bit 对应 0.5 灰度
MAX_VAL = 65535
STEPS = 16

for y in range(height):
    for x in range(width):
        t1 = sdf1[y, x]
        t2 = sdf2[y, x]

        if t1 < THRESHOLD and t2 < THRESHOLD:
            result = 0
        elif t1 > THRESHOLD and t2 > THRESHOLD:
            result = MAX_VAL
        else:
            # 两张图片之间插值
            result = 0
            for i in range(STEPS):
                weight = i / STEPS
                interp = (1 - weight) * t1 + weight * t2
                result += 0 if interp < THRESHOLD else MAX_VAL
            result //= STEPS

        output[y, x] = np.clip(result, 0, MAX_VAL)

# 保存 16bit PNG
out_img = Image.fromarray(output, mode='I;16')
out_img.save("output.png")
print("合成完成: output.png")
最终的算法
插值这个过程完全可以并行处理,首先每个像素之间就毫无关联,其次每个图片之间进行插值其实也没有关联。
使用numpy来进行并行化处理,numpy底层是c++模块,速度非常快。
这里采样点为256个对应灰度图范围,保存为8bit的灰度图(这里没必要16bit)。
import sys
import numpy as np
from PIL import Image

U8 = True

if len(sys.argv) < 3:
    print("用法: python compose.py img1.png img2.png [img3.png ...]")
    sys.exit(1)

def load_16bit_gray(path):
    img = Image.open(path)
    arr = np.array(img, dtype=np.uint16)
    return arr

# 读取所有图
images = [load_16bit_gray(path) for path in sys.argv[1:]]
arr = np.stack(images, axis=0)  # shape: (N, H, W)

if not np.all([img.shape == arr[0].shape for img in images]):
    raise ValueError("所有输入图片的尺寸必须相同")

THRESHOLD = 32768
MAX_VAL = 65535
N, H, W = arr.shape

# 全局 mask
all_below = np.all(arr < THRESHOLD, axis=0)
all_above = np.all(arr > THRESHOLD, axis=0)

output = np.zeros((H, W), dtype=np.float64)
output[all_below] = 0
output[all_above] = MAX_VAL

# 混合部分 mask
mix_mask = ~(all_below | all_above)

# 取混合部分像素
mix_pixels = arr[:, mix_mask].astype(np.float64)  # shape: (N, M)  M = 混合像素个数
M = mix_pixels.shape[1]

# 256 个采样权重
samples = 256
weights = np.linspace(0, 1, samples, endpoint=False)

# 每个采样点属于哪两个图之间
intervals = np.floor(weights * (N - 1)).astype(int)  # shape: (samples,)
local_w = (weights * (N - 1)) - intervals           # shape: (samples,)

# 插值批量计算
interp_results = np.zeros((samples, M), dtype=np.float64)

for k in range(samples):
    i1 = intervals[k]
    i2 = i1 + 1
    val = (1 - local_w[k]) * mix_pixels[i1] + local_w[k] * mix_pixels[i2]
    interp_results[k] = (val >= THRESHOLD) * MAX_VAL

# 平均
res = np.mean(interp_results, axis=0)

# 回写结果
output[mix_mask] = res

if U8:
    # 转为浮点数,映射到 0~255
    output_float = output.astype(np.float32)
    output_scaled = output_float / 65535.0 * 255.0
    output_uint8 = np.clip(np.floor(output_scaled + 0.5), 0, 255).astype(np.uint8)
    # 保存 8 位灰度图
    out_img = Image.fromarray(output_uint8, mode='L')
    out_img.save("output8.png")
    print(f"合成完成: output8.png,合并了 {N} 张图片")
else:
    output = np.clip(output, 0, MAX_VAL).astype(np.uint16)
    out_img = Image.fromarray(output, mode='I;16')
    out_img.save("output16.png")
    print(f"合成完成: output16.png,合并了 {N} 张图片")
效果:
原始图片:

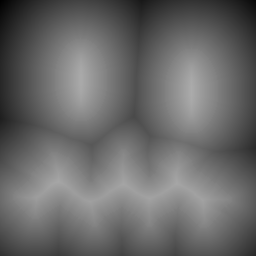
生成的sdf如图,这里因为scale的关系,看起来都比较接近灰色。

合成sdf:
wikipedia, Signed distance function, https://en.wikipedia.org/wiki/Signed_distance_function ↩︎
cronrpc, (2025), Signed Distance Field 2D Generator, https://github.com/cronrpc/Signed-Distance-Field-2D-Generator ↩︎
Chris Green. Valve. (2007). Improved Alpha-Tested Magnification for Vector Textures and Special Effects, https://steamcdn-a.akamaihd.net/apps/valve/2007/SIGGRAPH2007_AlphaTestedMagnification.pdf ↩︎
Metric Space, https://en.wikipedia.org/wiki/Metric_space ↩︎
Lisapple, (2017), 8SSEDT , GitHub, https://github.com/Lisapple/8SSEDT ↩︎
Richard Mitton, (2009), Signed Distance Fields, http://www.codersnotes.com/notes/signed-distance-fields/ ↩︎
farteryhr, Correct 8SSEDT, https://replit.com/@farteryhr/Correct8SSEDT#main.cpp ↩︎
蛋白胨, Unity 卡通渲染 程序化天空盒, https://zhuanlan.zhihu.com/p/540692272 ↩︎